In the previous installment of this series we created a spring boot based backend for managing Club entities.
Here, we will create a React based frontend that allows us to edit
individual Clubs.
Creating the client
We will scaffold an empty project with vite:
pnpm create viteIn the options choose
- React
- TypeScript
Then we add the necessary dependencies
pnpm add primereact primeiconspnpm add react-hook-form @hookform/resolvers zod react-query @tanstack/react-router@betapnpm add -D sassNow we can already start the dev server and see our generated application:
pnpm devWe open the browser at http://127.0.0.1:5173/ and are greeted with the scaffolded sample app:

Integrating the router
First we integrate tanstack router by adding a root route in client-react/src/pages/root.tsx:
import { createRouteConfig, Link, Outlet } from "@tanstack/react-router";import React, { FC } from "react";
export const RootLayout: FC = () => {  return (    <>      <div>        <Link to="/">Home</Link>        <Link to="/about">About</Link>      </div>      <hr />      <Outlet />    </>  );};
Let’s add a few pages:
-
The Homepage
src/pages/index.tsxexport const IndexPage: FC = () => {return (<div><h3>Home</h3></div>);}; -
the club list
src/pages/club/index.tsxexport const ClubListPage: FC = () => {const router = useRouter();return (<div><h3>Clubs List!</h3></div>);}; -
the individual Club page and
src/pages/club/club.tsxwith the contentexport const ClubPage: FC = () => {return (<div><h3>Club Page</h3></div>);}; -
src/pages/club/edit.tsxwith contentexport const ClubEditPage: FC = () => {return (<div><h3>Edit Club Page</h3></div>);};
Now we can hook those up in src/main.tsx
import React from "react";import ReactDOM from "react-dom/client";import "./index.css";import { createReactRouter, createRouteConfig, RouterProvider,} from "@tanstack/react-router";import { RootLayout } from "./pages/root";import { ClubListPage } from "./pages/club";import { ClubPage } from "./pages/club/club";import { ClubEditPage } from "./pages/club/edit";
export const rootRoute = createRouteConfig({ component: RootLayout,});const homeRoute = rootRoute.createRoute({ path: "/", component: IndexPage,});const clubsRoute = rootRoute.createRoute({ path: "/clubs", component: ClubListPage,});const clubRoute = rootRoute.createRoute({ path: "/clubs/$clubId", component: ClubPage,});const clubEditRoute = rootRoute.createRoute({ path: "/clubs/$clubId/edit", component: ClubEditPage,});
const routeConfig = rootRoute.addChildren([ clubEditRoute, clubRoute, clubsRoute, homeRoute,]);
const router = createReactRouter({ routeConfig });
declare module "@tanstack/react-router" { interface RegisterRouter { router: typeof router; }}
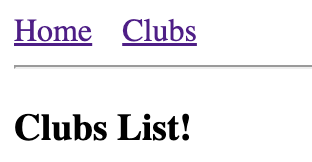
ReactDOM.createRoot(document.getElementById("root") as HTMLElement).render( <React.StrictMode> <RouterProvider router={router} /> </React.StrictMode>);Once we have all that we are greeted with a beautiful navigation header which allows us to switch between the pages:

Fixing the styling
While this is looking not too bad from a functionality perspective, it lacks visual style. So let’s integrate primereact a little bit better and fix some of the styling issues:
-
rename
index.csstoindex.scssand replace its content with@use "primereact/resources/themes/lara-light-indigo/theme.css"; //theme@use "primereact/resources/primereact.min.css"; //core css@use "primeicons/primeicons.css"; -
create
src/pages/root.module.scsswith the following content.headerNav {display: flex;gap: 15px;} -
and import it into
src/pages/root.tsximport styles from './root.module.scss'export const RootLayout: FC = () => {return (<><header><nav className={styles.headerNav}>
Now it should look as follows:
While this is not particularily pretty, its good enough for this tutorial and will also ensure that all the PrimeReact components have proper styling.
Integrating react-query
For data loading we will use react-query which needs to be set up in src/main.tsx.
we simply need to create a QueryClient and wrap the whole application
in a QueryClientProvider like so:
...const queryClient = new QueryClient()
ReactDOM.createRoot(document.getElementById('root') as HTMLElement).render(  <React.StrictMode>    <QueryClientProvider client={queryClient}>      <RouterProvider router={router} />    </QueryClientProvider>  </React.StrictMode>)
Before we can load the list of clubs we first need to setup the loaders and the data model.
Since we are using zod for validation
we can already define the REST models like that in src/model/model.ts
import { z } from "zod";
export const ClubSchema = z.object({  clubName: z.string().min(2).max(150),  managerEmail: z.string().email().max(200),  id: z.string().optional(),});
export type Club = z.infer<typeof ClubSchema>;
Then we define the api methods in src/api/api.ts
import { Club } from "../model/model";
export async function fetchClubs() {  const result = await fetch("/api/clubs");  return (await extractJsonOrError<any>(result))._embedded.clubs as Club[];}
async function extractJsonOrError<T>(result: Response): Promise<T> {  let body: any;  try {    body = await result.json();  } catch (e) {    console.error("error extracting error body", e);  }  if (!result.ok) {    const error = new Error("Network response was not ok", { cause: body });    throw error;  }  return body as T;}
export async function fetchClub(id: string): Promise<Club> {  const result = await fetch(`/api/clubs/${id}`);  return await extractJsonOrError(result);}
export async function updateClub(club: Club): Promise<Club> {  const result = await fetch(`/api/clubs/${club.id}`, {    body: JSON.stringify(club),    method: "PUT",    headers: { "content-type": "application/json", accept: "application/json" },  });  return extractJsonOrError(result);}
This allows us to load the list of clubs, fetch a single club as well as update an existing club.
One thing missing is the proxy configuration in the frontend that
will allow us to connect to the spring backend. Add the following lines to client-react/vite.config.ts
export default defineConfig({ plugins: [react()], server: { proxy: { "/api": "http://localhost:8080", }, },});Loading the club data
As we have all the basics out of the way we can finally load
our club list in src/pages/club/index.tsx
export const ClubListPage: FC = () => { const { data, error, isLoading } = useQuery("clubs", fetchClubs); const [selectedClub, setSelectedClub] = useState<Club | undefined>(undefined); const router = useRouter(); return ( <div> <> <h3>Clubs List!</h3> {error && <Message severity={"error"}>{JSON.stringify(error)}</Message>} <DataTable value={data} responsiveLayout="scroll" loading={isLoading} selectionMode={"single"} selection={selectedClub} onSelectionChange={(e) => { setSelectedClub(e.value); router.navigate({ to: "/clubs/$clubId", params: { clubId: e.value.id }, }); }} dataKey="id" > <Column field="id" header="ID"></Column> <Column field="clubName" header="Club Name"></Column> <Column field="managerEmail" header="managerEmail"></Column> </DataTable> </> </div> );};Now browsing to http://localhost:5173/clubs produces 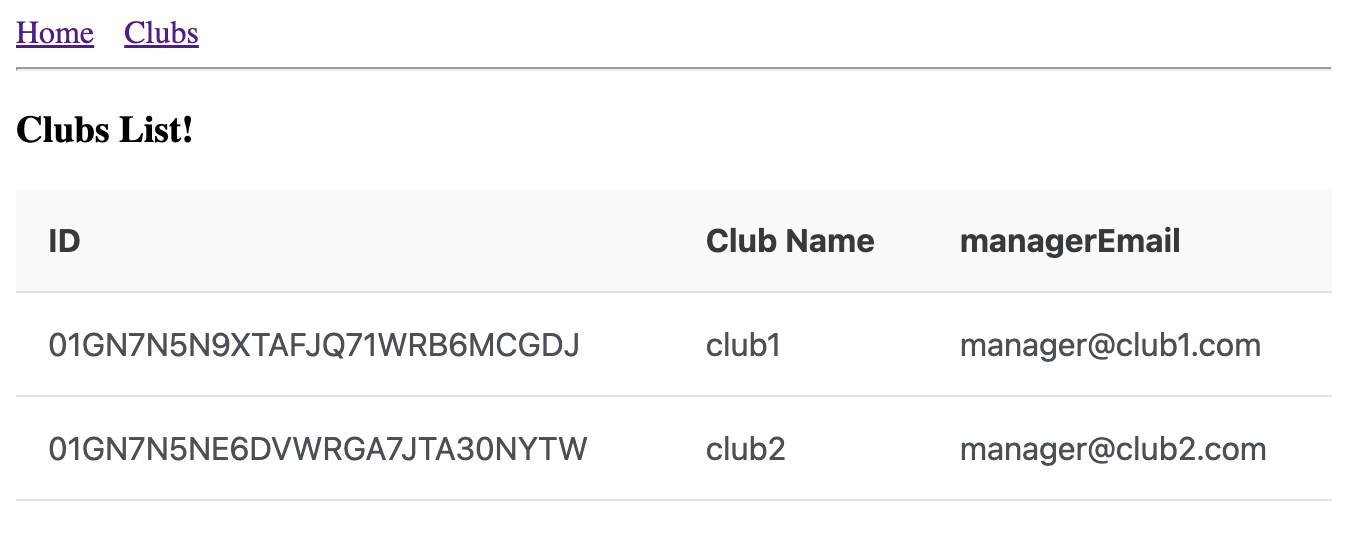
Clicking on a club line will cause the browser to navigate to http://localhost:5173/clubs/395152559210943000
which is currently still an empty page, let’s fix that by changing src/pages/club/edit.tsx to
export const ClubEditPage: FC = () => {  const { clubId } = useParams();  const { data } = useQuery(    ["clubs", clubId],    () => fetchClub(clubId ?? "N/A"),    { enabled: !!clubId }  );
  const {    formState: { errors },    handleSubmit,    register,    setError,  } = useForm({ defaultValues: data, resolver: zodResolver(ClubSchema) });
  const [serverErrors, setServerErrors] = useState<string | undefined>(    undefined  );
  const toastRef = useRef<Toast>();  const mutation = useMutation(updateClub, {    onMutate: (_variables) => {      setServerErrors(undefined);    },    onSuccess: (result, _variables, _context) => {      toastRef.current?.show({ severity: "success", summary: "Changes saved" });    },    onError: (error: any, _variables, _context) => {      console.log("mutation error", error);      const errorDetails = error.cause?.errors;      if (errorDetails) {        Object.keys(errorDetails).forEach((key) => {          setError(key as any, errorDetails[key]);        });        setServerErrors(errorDetails.message);        toastRef.current?.show({          severity: "error",          summary: "Saving failed: " + errorDetails.message,        });      } else {        toastRef.current?.show({          severity: "error",          summary: "Saving failed: " + error.message,        });      }    },  });
  const doSubmit = useCallback<(club: Club) => void>((vals: any) => {    console.log("submit values", vals);    mutation.mutate(vals);  }, []);
  const getFormErrorMessage = useCallback<(n: string) => ReactNode | undefined>(    (name) =>      errors[name] && <small className="p-error">{errors[name].message}</small>,    [errors]  );
  const haveErrors = Object.keys(errors).length > 0;  return (    <div>      <>        Club Edit {clubId}        <Toast ref={toastRef} />        {data && (          <>            <Card>              {haveErrors && (                <Message                  severity={"warn"}                  text={serverErrors ?? "Please check your input!"}                />              )}              <form                method={"post"}                onSubmit={handleSubmit(doSubmit)}                className="p-fluid"              >                <input                  type={"hidden"}                  defaultValue={data.id}                  {...register("id")}                />                <fieldset>                  <div className="field">                    <label                      htmlFor={"clubName"}                      className={classNames({ "p-error": errors.clubName })}                    >                      ClubName                    </label>                    <InputText                      id={"clubName"}                      defaultValue={data.clubName}                      {...register("clubName")}                      className={classNames({ "p-invalid": !!errors.clubName })}                    />                    {getFormErrorMessage("clubName")}                  </div>                </fieldset>                <fieldset>                  <div className="field">                    <label                      htmlFor={"managerEmail"}                      className={classNames({ "p-error": errors.managerEmail })}                    >                      managerEmail                    </label>                    <InputText                      id={"managerEmail"}                      defaultValue={data.managerEmail}                      {...register("managerEmail")}                      className={classNames({                        "p-invalid": !!errors.managerEmail,                      })}                    />                    {getFormErrorMessage("managerEmail")}                  </div>                </fieldset>                <Button type={"submit"} disabled={mutation.isLoading}>                  Save                </Button>              </form>            </Card>          </>        )}      </>    </div>  );};
Wow, thats a lot to unpack here.
const { clubId } = useParams();const { data } = useQuery(["clubs", clubId], () => fetchClub(clubId ?? "N/A"), { enabled: !!clubId,});The first portion is the same as the club details page. We simply load the club if we don’t have it already.
Next, we create a react-hook-form instance
const { formState: { errors }, handleSubmit, register, setError,} = useForm({ defaultValues: data, resolver: zodResolver(ClubSchema) });The errors variable will contain the client side form validation errors
in the format
{ "clubName": { "message": "String must contain at least 2 character(s)", "ref": "<reference of the ui element>", "type": "too_small" }}Next we also store server side errors in a serverErrors state hook.
const [serverErrors, setServerErrors] = useState<string | undefined>(undefined);
const toastRef = useRef<Toast>();
In addition we set up a reference to the Toast component which we will need to show server side
errors to the user.
Then we define the mutation to update the Club
const mutation = useMutation(updateClub, { onMutate: (_variables) => { setServerErrors(undefined); }, onSuccess: (result, _variables, _context) => { toastRef.current?.show({ severity: "success", summary: "Changes saved" }); }, onError: (error: any, _variables, _context) => { const errorDetails = error.cause?.errors; if (errorDetails) { Object.keys(errorDetails).forEach((key) => { setError(key as any, errorDetails[key]); }); setServerErrors(errorDetails.message); toastRef.current?.show({ severity: "error", summary: "Saving failed: " + errorDetails.message, }); } else { toastRef.current?.show({ severity: "error", summary: "Saving failed: " + error.message, }); } },});Here, in onMutate we clear any previous serverErrors, then in
onSuccess we simply show a Toast to the user that
saving was successful.
The onError portion is the most interesting, we parse the server
error response and if it has the correct format, we directly
map the per-attribute server errors into the client form.
So this is where the work from part 1
finally pays off. setError allows us to programmatically set
validation errors into the form.
const doSubmit = useCallback<(club: Club) => void>((vals: any) => { console.log("submit values", vals); mutation.mutate(vals);}, []);This is the form submit handler which simply fires off the mutation.
const getFormErrorMessage = useCallback<(n: string) => ReactNode | undefined>(  (name) =>    errors[name] && <small className="p-error">{errors[name].message}</small>,  [errors]);
const haveErrors = Object.keys(errors).length > 0;
The getFormErrorMessage helper is used to render validation errors directly into the form.
Finally, we add the form via
<form method={'post'} onSubmit={handleSubmit(doSubmit)} className="p-fluid" > ... <fieldset> <div className="field"> <label htmlFor={'clubName'} className={classNames({ 'p-error': errors.clubName })} > ClubName </label> <InputText id={'clubName'} defaultValue={data.clubName} {...register('clubName')} className={classNames({ 'p-invalid': !!errors.clubName })} /> {getFormErrorMessage('clubName')} </div> </fieldset>Here we create the form which calls handleSubmit(doSubmit) upon
sending the form.
The handleSubmit function will first validate the form and only if it
is valid, it will invoke the inner doSubmit method that will trigger
the AJAX request.
Testing server side validation errors
Now if you remember the zod validation we created way back when,
you might notice that there is a discrepancy between the minimum
length in typescript
export const ClubSchema = z.object({ clubName: z.string().min(2).max(150),and the corresponding java code
public class Club { ... @Column @NotBlank @Length(min = 3, max = 150) String clubName;To be able to produce a server side validation error all we need
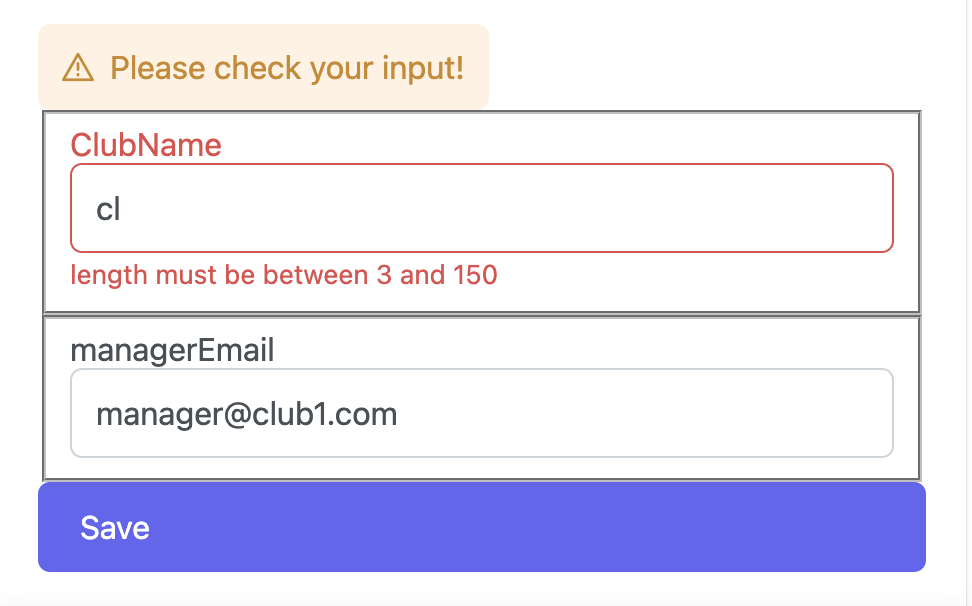
to do is to update a club and assign it a clubName that is
only 2 characters long.
The server side validation errors are rendered in-line just like
client side validation errors would.
This concludes part 2 of the tutorial. In part 3 we will create the same application in Svelte to compare the client side implementation and find out why the hype around Svelte is justified.
You can find the code to this tutorial at https://github.com/rburgst/spring-boot-validation