Creating a spring boot app with a SPA frontend and end-to-end validation
In this three part tutorial we will be creating a simple JPA Rest Repository based application with spring boot. In the upcoming parts we will connect a TypeScript frontend to it and explore how to properly handle validation with Jakarta Bean Validation and zod on the client side.
In addition we will explore some best practices on Entity modeling
(e.g. the significance of equals/hashCode, choosing good primary keys, etc.).
Finally, we obviously are using the latest spring boot version 3.0.1 together with hibernate 6.1.6.
Creating the server
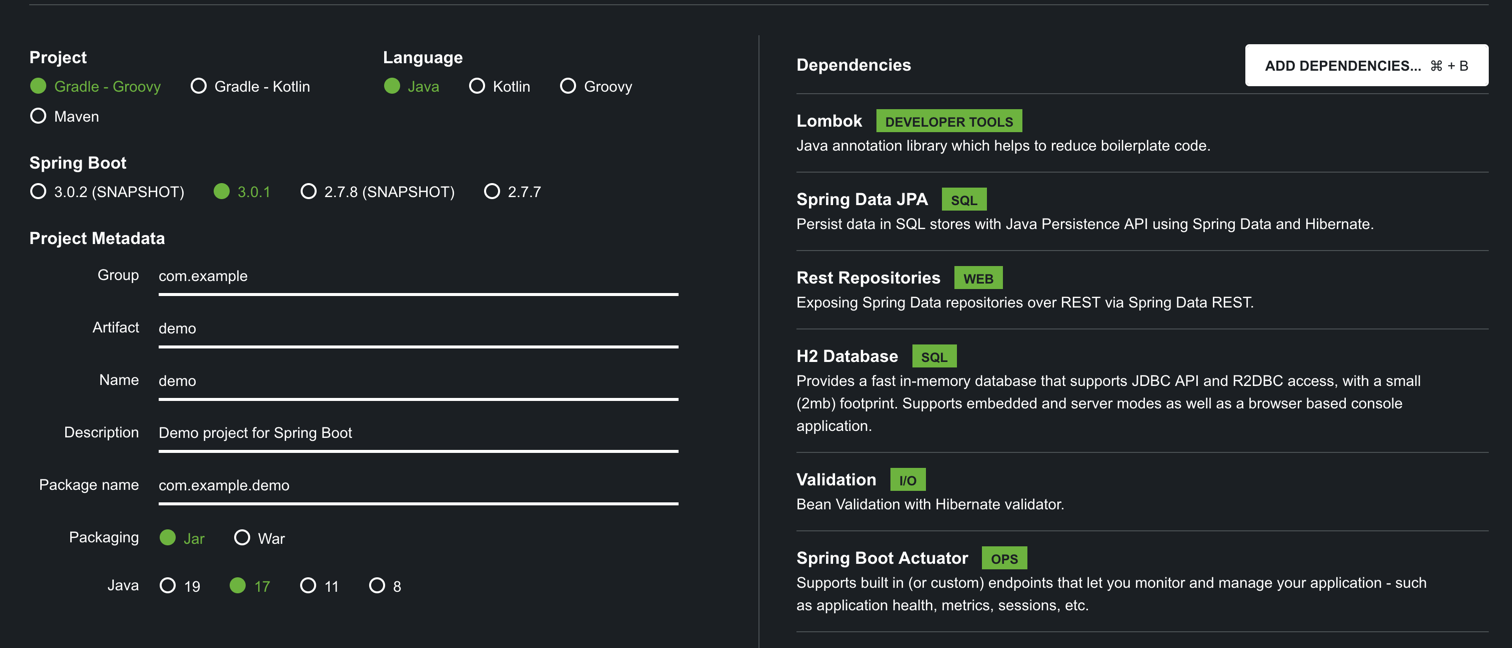
To create the server go to https://start.spring.io and create a project with the following dependencies
- Lombok
- Spring Data JPA
- H2 database
- Rest Repository
- Validation
- Spring Boot Actuator
Choosing a good ID
Typically we would be choosing either a Long or a UUID for the primary key of our
entities, however, Longs are problematic as they allow an attacker to easily
guess the ID of other entities, and UUIDs don’t have an inherent sorting order
which makes them a poor choice for B+Tree index structures (see also this article).
Therefore, we will be using Ulid as a primary key (see also this article, or this).
implementation("com.github.f4b6a3:ulid-creator:5.1.0")In addition we shamelessly copy the KeyGenerator class from the article.
public class KeyGenerator implements IdentifierGenerator {
    @Override    public Object generate(SharedSessionContractImplementor session, Object object) throws HibernateException {        return UlidCreator.getUlid().toString();    }}
Creating the data model
Let’s create our entity for the project:
@Entity@Table(uniqueConstraints = {        @UniqueConstraint(name = "clubNameUnique", columnNames = {"clubName"})})@Getter @Setter@NoArgsConstructor@AllArgsConstructorpublic class Club {    @Id    @Column(updatable = false)    @GenericGenerator(name = "ulid_gen",            strategy = "com.example.springbootvalidation.util.KeyGenerator")    @GeneratedValue(generator = "ulid_gen")    String id;
    @Column    @NotBlank    @Length(min = 3, max = 150)    String clubName;
    @Column    @Email    @NotBlank    @Length(max = 200)    String managerEmail;
    public Club(String clubName, String managerEmail) {        this.clubName = clubName;        this.managerEmail = managerEmail;    }
    @Override    public boolean equals(Object o) {        if (this == o) return true;        if (o == null || Hibernate.getClass(this) != Hibernate.getClass(o)) return false;        Club club = (Club) o;        return id != null && Objects.equals(id, club.id);    }
    @Override    public int hashCode() {        return getClass().hashCode();    }}
Note that the equals and hashCode methods were created using the
JPA Buddy plugin and are in line with
the recommendations.
Further note that we will let Hibernate create the DB schema automatically, which is
good for a demo, but for production you would use something like
liquibase or flyway.
Finally, we are using a custom IdentifierGenerator to auto-populate the
id for newly created Club entities (see also this article).
In addition to the entity, we obviously need a Repository
public interface ClubRepository extends JpaRepository<Club, String> {}Since we are using an in-memory h2 database, we should ingest some data upon application startup.
So we simply add an ApplicationRunner into our SpringBootValidationApplication
@Bean ApplicationRunner dataIngester(ClubRepository repository) { return args -> { repository.save(new Club("club1", "manager@club1.com")); repository.save(new Club("club2", "manager@club2.com")); }; }Finally, we will disable open-in-view
in application.properties since this is
generally a good idea.
spring.jpa.open-in-view=falseCreating the REST interface
We will be using spring data rest repositories,
therefore, the implementation is trivial.
All we need to do is add a single annotation to
our ClubRepository:
@RepositoryRestResourcepublic interface ClubRepository extends JpaRepository<Club, String> {}In addition, we make the repository available under the /api path
which will facilitate our client application integration.
Therefore, simply add the following line to application.properties
spring.data.rest.basePath=/apiTesting the REST interface
Now we should have everything ready to be able to query our REST interface. We will be using httpie
http :8080/api/clubsand get the following result:
HTTP/1.1 200Connection: keep-aliveContent-Type: application/hal+jsonDate: Mon, 26 Dec 2022 09:39:54 GMTKeep-Alive: timeout=60Transfer-Encoding: chunkedVary: OriginVary: Access-Control-Request-MethodVary: Access-Control-Request-Headers
{    "_embedded": {        "clubs": [            {                "_links": {                    "club": {                        "href": "http://localhost:8080/api/clubs/395148707155466489"                    },                    "self": {                        "href": "http://localhost:8080/api/clubs/395148707155466489"                    }                },                "clubName": "club1",                "managerEmail": "manager@club1.com"            },            {                "_links": {                    "club": {                        "href": "http://localhost:8080/api/clubs/395148707482618713"                    },                    "self": {                        "href": "http://localhost:8080/api/clubs/395148707482618713"                    }                },                "clubName": "club2",                "managerEmail": "manager@club2.com"            }        ]    },    "_links": {        "profile": {            "href": "http://localhost:8080/api/profile/clubs"        },        "self": {            "href": "http://localhost:8080/api/clubs"        }    },    "page": {        "number": 0,        "size": 20,        "totalElements": 2,        "totalPages": 1    }}
This looks already quite good, but we are missing the id which
we would like to use in the client (without having to parse it out
of the self link).
Adding id to the responses
This can be achieved by implementing RepositoryRestConfigurer like so
@Configuration@RequiredArgsConstructorclass RestConfiguration implements RepositoryRestConfigurer {    private final EntityManager entityManager;
    @Override    public void configureRepositoryRestConfiguration(            RepositoryRestConfiguration config, CorsRegistry cors) {        Class[] classes = entityManager.getMetamodel()                .getEntities().stream().map(Type::getJavaType).toArray(Class[]::new);        config.exposeIdsFor(classes);    }}
This basically exposes the id for all JPA entities.
If we try the httpie call from above we should now get
the ids along with the rest of the data
{ "_embedded": { "clubs": [ { "_links": {...}, "clubName": "club1", "id": 395150462955123467, "managerEmail": "manager@club1.com"Testing the validation
To check whether our validation annotations work we will try to insert invalid data into the database via the REST interface.
Since the clubName must be at least 3 characters long
we will try to insert one with 2 characters:
http :8080/api/clubs clubName=fo managerEmail=manager@email.comand we get the following response
HTTP/1.1 500Connection: closeContent-Type: application/jsonDate: Mon, 26 Dec 2022 09:49:28 GMTTransfer-Encoding: chunkedVary: OriginVary: Access-Control-Request-MethodVary: Access-Control-Request-Headers
{    "error": "Internal Server Error",    "path": "/api/clubs",    "status": 500,    "timestamp": "2022-12-26T09:49:28.567+00:00"}
Well thats not very helpful. In the completed application
we want to annotate the entry form with the validation
errors. Therefore, a blank 500 error won’t do.
Serializing validation errors
In order to be able to control the error responses we need to implement
ResponseEntityExceptionHandler as documented here.
@ControllerAdviceclass RestResponseEntityExceptionHandler extends        ResponseEntityExceptionHandler {
    @ExceptionHandler({ConstraintViolationException.class})    public ResponseEntity<Object> handleConstraintViolation(            Exception ex, WebRequest request) {        ConstraintViolationException nevEx = findException(ex, ConstraintViolationException.class);
        Map<String, Map<String, String>> errs = new HashMap<>();        nevEx.getConstraintViolations().stream()                .forEach(constraintViolation -> errs.put(constraintViolation.getPropertyPath().toString(), Map.of("message", constraintViolation.getMessage())));        ProblemDetail problemDetail = ProblemDetail.forStatusAndDetail(HttpStatus.BAD_REQUEST, "validation failed");        problemDetail.setProperty("errors", errs);        problemDetail.setType(URI.create("https://developer.mozilla.org/en-US/docs/Web/HTTP/Status/400"));
        return ResponseEntity.badRequest().body(problemDetail);    }
    private <T extends Throwable> T findException(Throwable throwable, Class<T> expected) {        Throwable cur = throwable;        while (cur != null) {            if (expected.isAssignableFrom(cur.getClass())) {                return ((T) cur);            }            cur = cur.getCause();        }        throw new IllegalArgumentException("throwable %s is not of type %s".formatted(throwable, expected));    }}
If we now try our POST again
http :8080/api/clubs clubName=fo managerEmail=manager@email.comwe now get a nicely formatted 400 error:
{ "detail": "validation failed", "errors": { "clubName": { "message": "length must be between 3 and 150" } }, "instance": "/api/clubs", "status": 400, "title": "Bad Request", "type": "https://developer.mozilla.org/en-US/docs/Web/HTTP/Status/400"}So with this the server is now fully prepared to serve content for our frontend app. Continue to part 2 of this tutorial.
The code can be found at https://github.com/rburgst/spring-boot-validation