I recently installed a PV power plant on my roof and wanted to measure the power generation and the resulting energy delivery and consumption of my home.
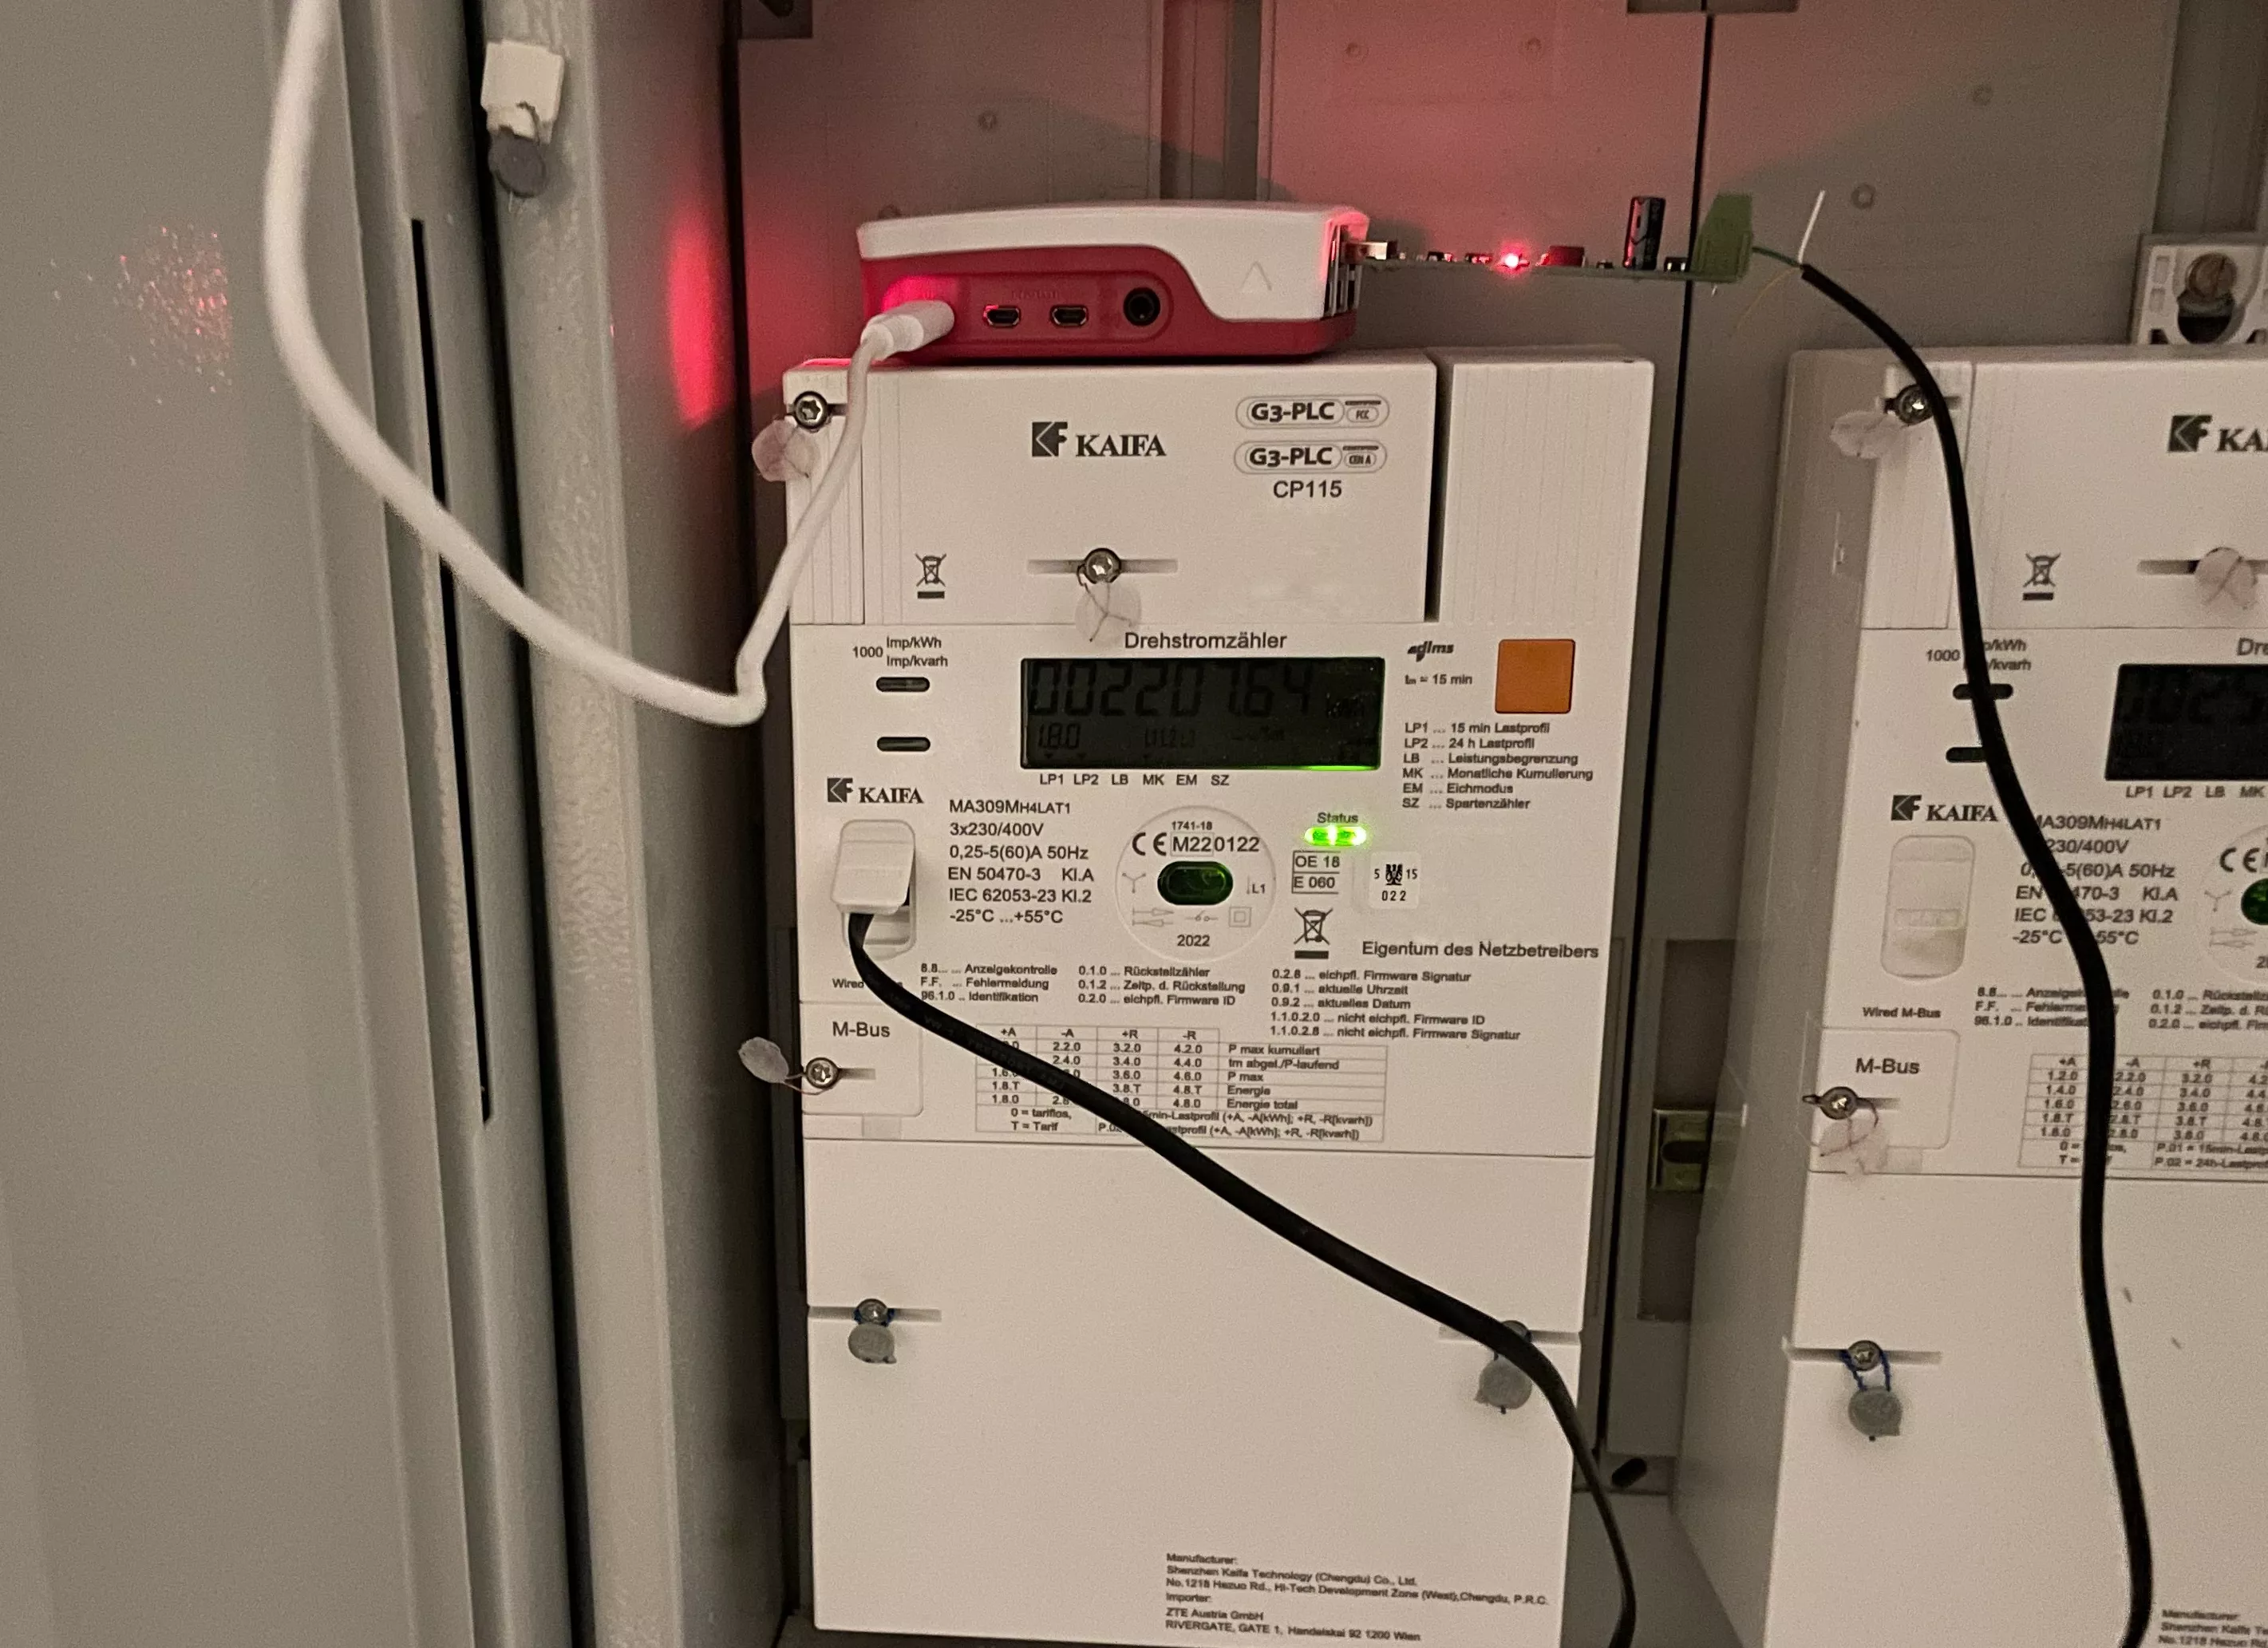
I am a customer of Salzburg AG which uses the KAIFA KA309M smart meter. Unfortunately, neither home assistant nor iobroker have a direct integration out of the box, so we need to do some legwork to get it working.
The following project https://www.libe.net/smart-meter has basically all the necessary ingredients to get it to work, however it stops at the MQTT part and leaves the rest (i.e. which MQTT server, how to get everything to work) up to the user to figure out.
Hardware
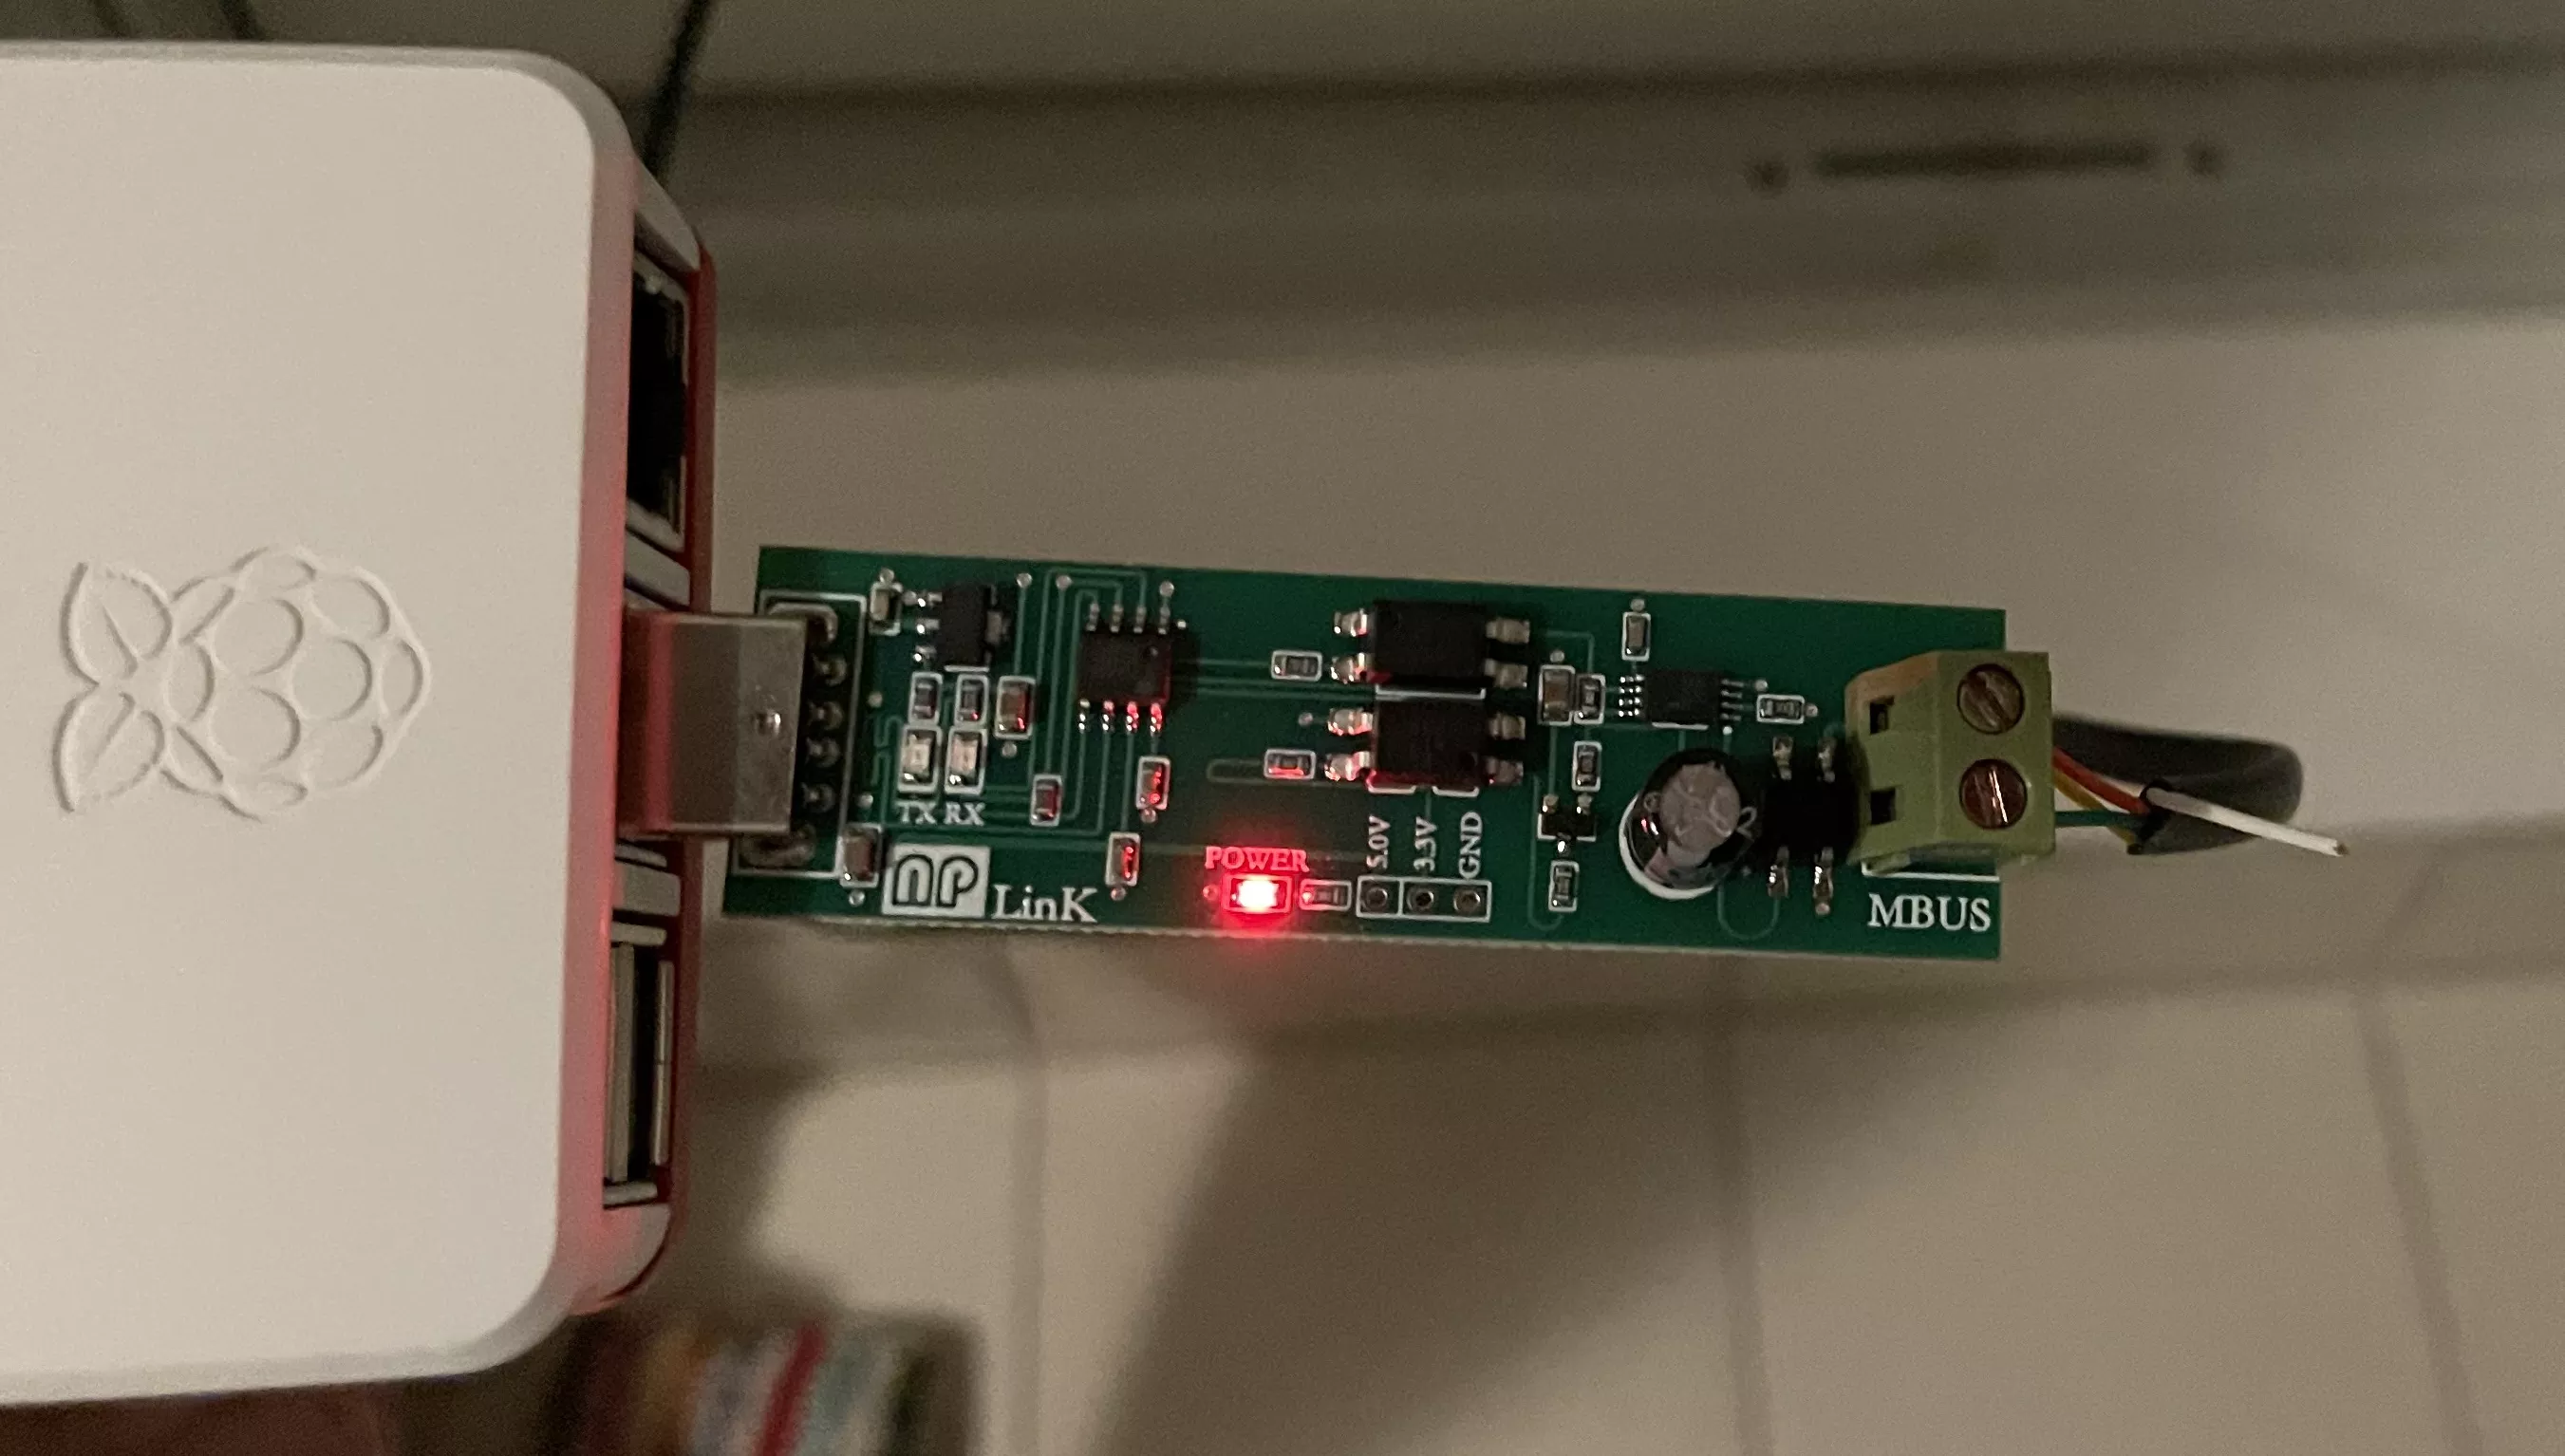
- USB to MBUS Slave Converter: https://amzn.to/3Eb0cpR
- Raspberry PI 4 (any version should actually do, 2GB should be sufficient)
Installing the Raspberry PI
As I didn’t have all the cables for the raspberry pi to connect a monitor and keyboard I chose the headless variant: https://www.tomshardware.com/reviews/raspberry-pi-headless-setup-how-to,6028.html
I chose bullseye 64 bit lite as I didn’t need a UI.
After the initial installation, I upgraded everything to the latest version
sudo apt-get update && sudo apt-get upgradeAfter this was finished a reboot should be done
sudo rebootWhile we wait for the raspberry to come back up, its a good time to configure a static DHCP mapping on your router or configure a static ip directly on your raspberry pi.
I didn’t specifically install node.js but I initially intended to use iobroker which installed node.js automatically for me, see https://www.allroundbastler.de/projekte/iobroker-installation-auf-dem-raspberry-pi/ for instructions. Otherwise, this article might give you some insights.
Mosquitto
Installing mosquitto on raspberry is fairly trivial:
sudo apt install -y mosquitto mosquitto-clientsThen we configure password based authentication:
vi /etc/mosquitto/conf.d/default.confwith the following content
allow_anonymous falsepassword_file /etc/mosquitto/passwdIf you need to access the MQTT broker from different machines in your network I recommend setting up TLS as well
allow_anonymous falsepassword_file /etc/mosquitto/passwd
port 1883
cafile /etc/mosquitto/certs/ca.crtkeyfile /etc/mosquitto/certs/server.keycertfile /etc/mosquitto/certs/server.crttls_version tlsv1.2
require_certificate false
listener 8883protocol mqtt
To generate the key files take a look at this FAQ article.
Test and ensure everything is working
mosquitto_rr -v -u mqtt -P MY_PASSWORD -h localhost -t test -e test -m "Hello there!" -p 1883 --cafile /etc/mosquitto/certs/ca.crtThis should produce
test Hello there!Note that testing on a mac with MQTTX was not successful for me after enabling TLS (your mileage may vary).
Setting up the MBUS Slave
This project has all the bits and pieces necessary to read out our KAIFA power meter. https://github.com/nooxnet/smart-meter-mbus-dlms
As of today it only works without TLS secured mosquitto but I have created a PR to support TLS (i.e. to ignore certificate errors with self signed certs): https://github.com/nooxnet/smart-meter-mbus-dlms/pull/1
The readme is pretty good and should get you started quite quickly.
I have added the following package.json (as the distribution did not contain one)
{ "name": "smart-meter-mbus-dlms", "version": "1.0.0", "description": "", "main": "smart-meter-mbus-dlms.js", "scripts": { "test": "echo \"Error: no test specified\" && exit 1", "start": "node smart-meter-mbus-dlms.js" }, "keywords": [], "author": "", "license": "ISC", "dependencies": { "config": "^3.3.9", "mqtt": "^5.0.3", "serialport": "^11.0.1", "smartmeter-obis": "^3.0.2" }}Then you can start and test the script with npm start.
If you enabled TLS (and you have the patched version), then you need to configure the mqtt section as follows:
{ serialPort: { port: "/dev/ttyUSB0", ... }, mqtt: { enabled: true, testMode: false, // if true: do not publish but log what would have been published host: "127.0.0.1", port: 8883, // Standard port for MQTT is 1883 (not encrypted) clientId: "SmartMeterElectricity01", // any name. But should be unique in your MQTT setup. username: "mqtt", password: "SUPER SECURE PASSWORD", rejectUnauthorized: false, // switch to `false` if you are using MQTTS with a self signed certificate ... }, debug: { // stop after this many if > 0 maxBytes: 0, // from serial port maxTelegrams: 0, // depending on your smart meter one APDU consists of 1 or 2 telegrams maxApplicationDataUnits: 0, // APDU, application protocol data unit ...specifically the new option rejectUnauthorized: false is needed.
After launching the script via npm start you should hopefully see something like this
Custom Data Notification Obis Data (plain text):Invoke Id: 1021986Datetime: 2023-08-26 08:27:400-0:1.0.0*255 Zeitpunkt 2023-08-26 08:27:400-0:96.1.0*255 Zählernummer 1KFM02003026130-0:42.0.0*255 Cosem logischer Gerätename KFM12002003026131-0:32.7.0*255 L1 Spannung, Momentanwert 235.6 V1-0:52.7.0*255 L2 Spannung, Momentanwert 235.9 V1-0:72.7.0*255 L3 Spannung, Momentanwert 235.2 V1-0:31.7.0*255 L1 Strom, Momentanwert 0.55 A1-0:51.7.0*255 L2 Strom, Momentanwert 0.62 A1-0:71.7.0*255 L3 Strom, Momentanwert 0.35 A1-0:1.7.0*255 Momentanleistung Bezug +P 0 W1-0:2.7.0*255 Momentanleistung Lieferung -P 83 W1-0:1.8.0*255 Summe Wirkenergie Bezug +A 2202662 Wh1-0:2.8.0*255 Summe Wirkenergie Lieferung -A 2013037 Wh1-0:3.8.0*255 Summe Blindenergie Bezug +R 752838 varh1-0:4.8.0*255 Summe Blindenergie Lieferung -R 755649 varhIf your MQTT configuration is correct then everything should be pushed to mosquitto where it can be picked up by homeassistant.
Also after testing you might want to set maxApplicationDataUnits: 0 to avoid
having the script stop after a single data unit.
Configuring HomeAssistant MQTT
I assume at this point that you have a running home assistant setup. I am running mine in docker but the way how you run it should not matter.
First install the mqtt integration here https://www.home-assistant.io/integrations/mqtt.
Then go to your user settings and ensure that you have enabled advanced mode.
Then, setup the mosquitto broker as follows (you first have to enter the basic connection details and check the “advanced options” switch):
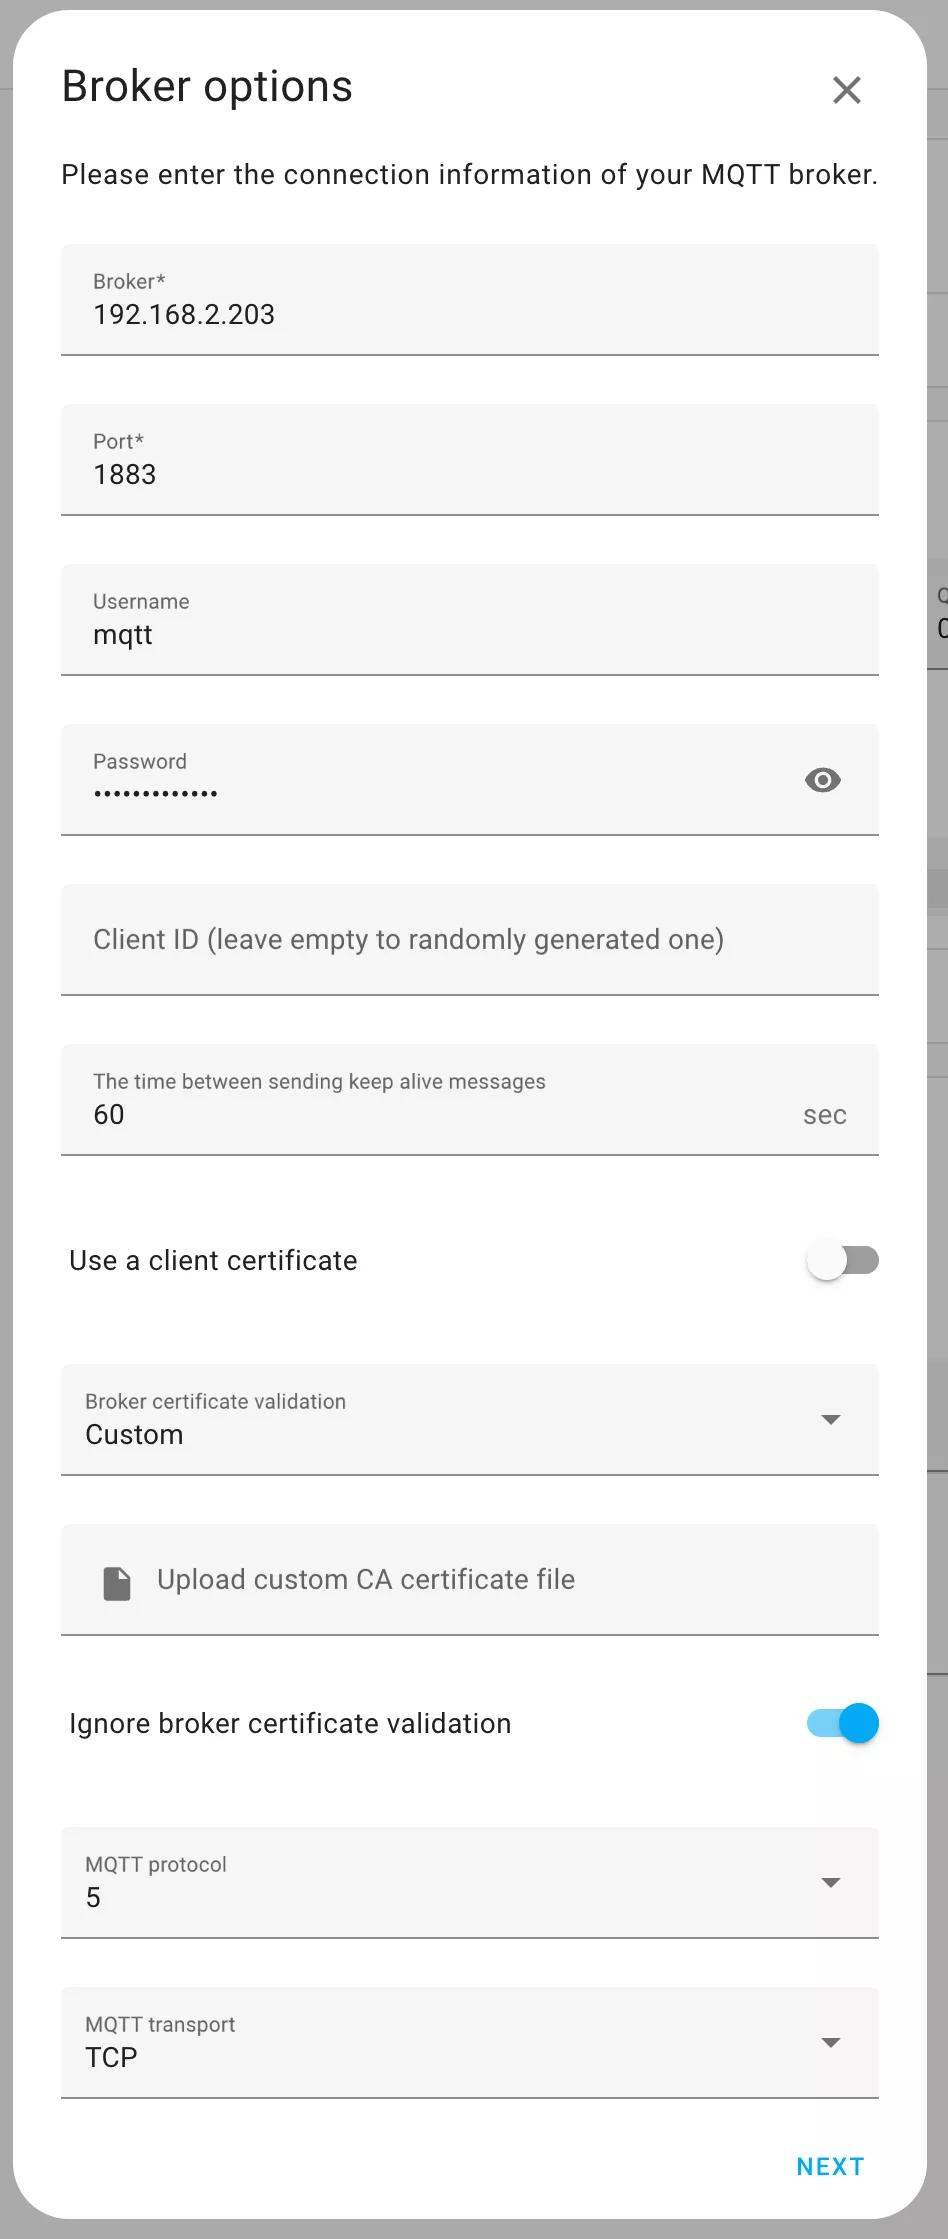
Note that if you have not enabled TLS (which seriously, you should do) then you don’t need to worry about the CA certificate file or the advanced options.
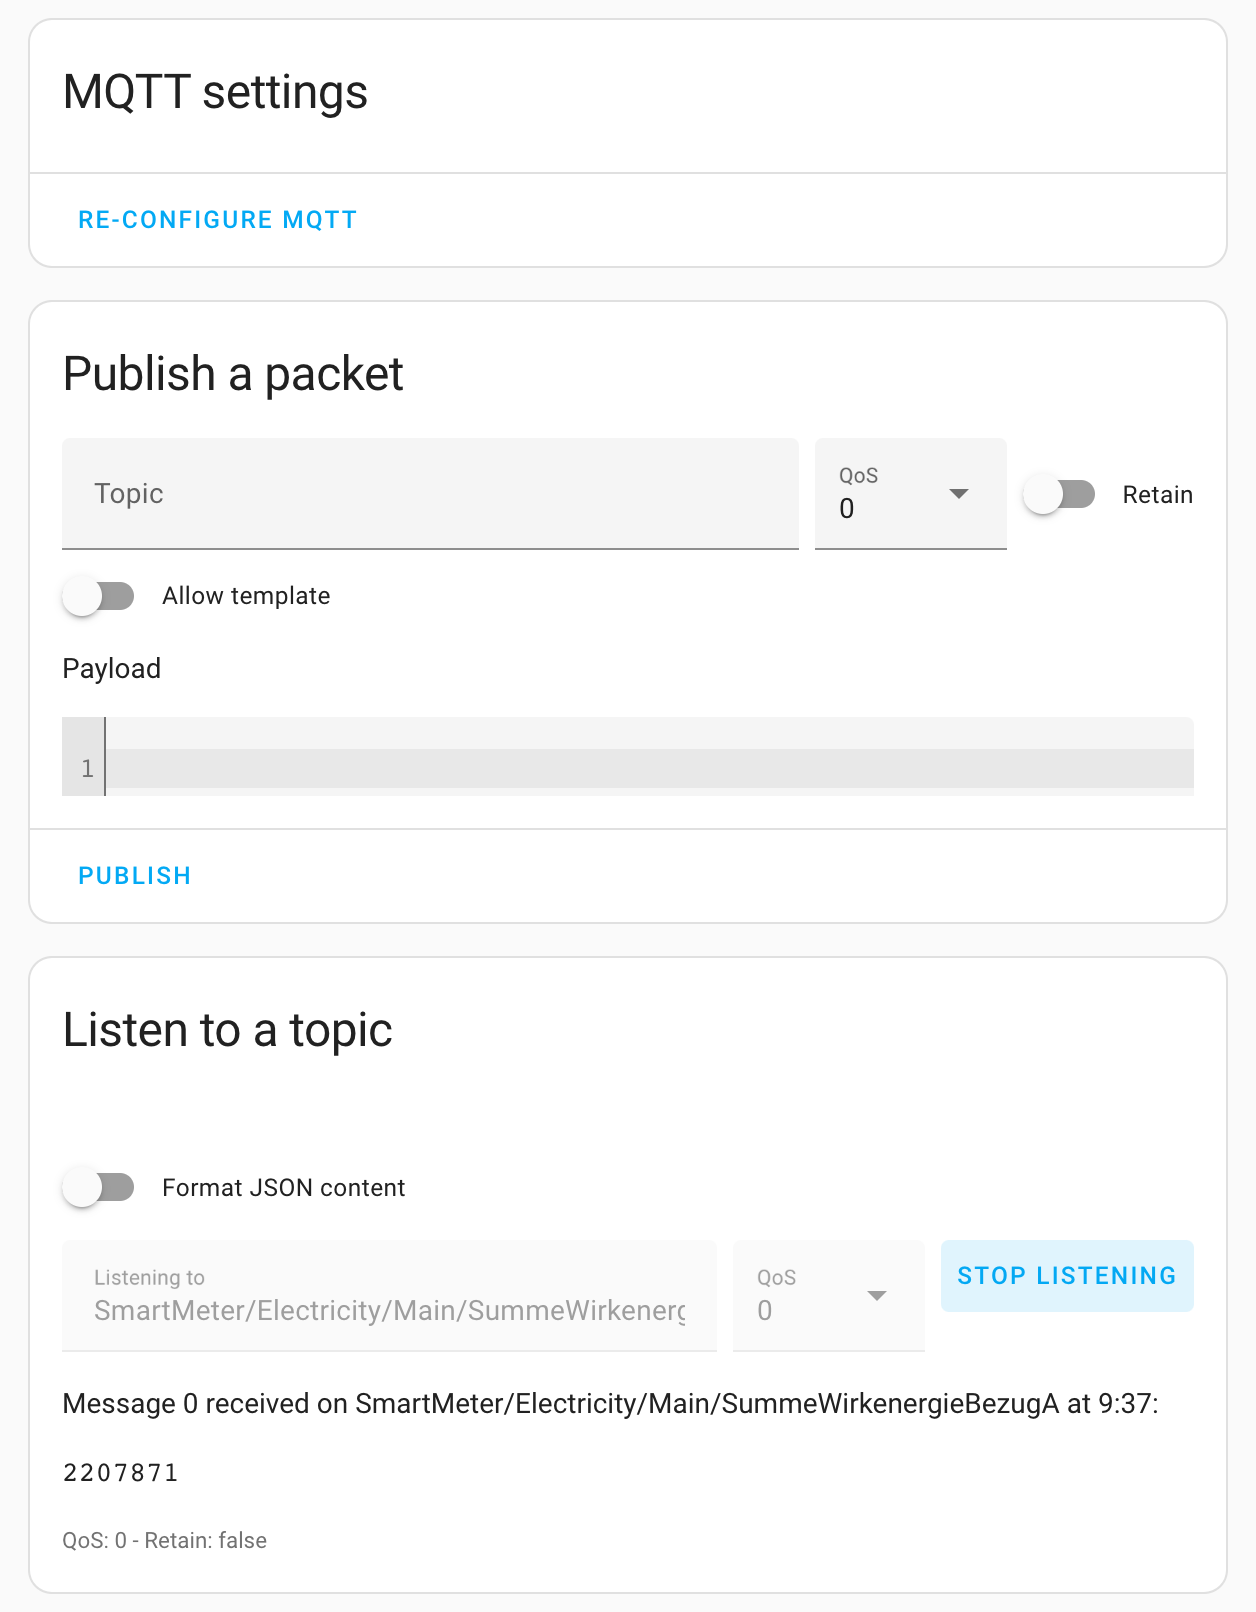
Now, if you set up everything successfully you can test it in the MQTT settings
screen by listening to the topic SmartMeter/Electricity/Main/SummeWirkenergieBezugA (enter the topic name and click Start Listening)
Setting up the Home Assistant energy sensors
Now that the MQTT connection is working all that is left is to configure the energy sensors which are being received via MQTT.
To do that you need to edit your configuration.yaml in the Home Assistant
installation directory.
mqtt: sensor: - name: "Summe Wirkenergie Lieferung" state_topic: "SmartMeter/Electricity/Main/SummeWirkenergieLieferungA" value_template: "{{ value | float(0) / 1000 }}" unit_of_measurement: "kWh" device_class: energy state_class: total_increasing force_update: true - name: "Summe Wirkenergie Bezug" state_topic: "SmartMeter/Electricity/Main/SummeWirkenergieBezugA" value_template: "{{ value | float(0) / 1000 }}" unit_of_measurement: "kWh" device_class: energy state_class: total_increasing force_update: true - name: "Momentanleistung Lieferung" device_class: power state_class: measurement unit_of_measurement: "kW" value_template: "{{ value | float(0) / 1000 }}" state_topic: "SmartMeter/Electricity/Main/MomentanleistungLieferungP" force_update: true - name: "Momentanleistung Bezug" device_class: power state_class: measurement unit_of_measurement: "kW" value_template: "{{ value | float(0) / 1000 }}" state_topic: "SmartMeter/Electricity/Main/MomentanleistungBezugP" force_update: trueRestart your Home Assistant to make those config values stick and you should now have the new sensors available.
The only thing left to do is to configure the energy dashboard.
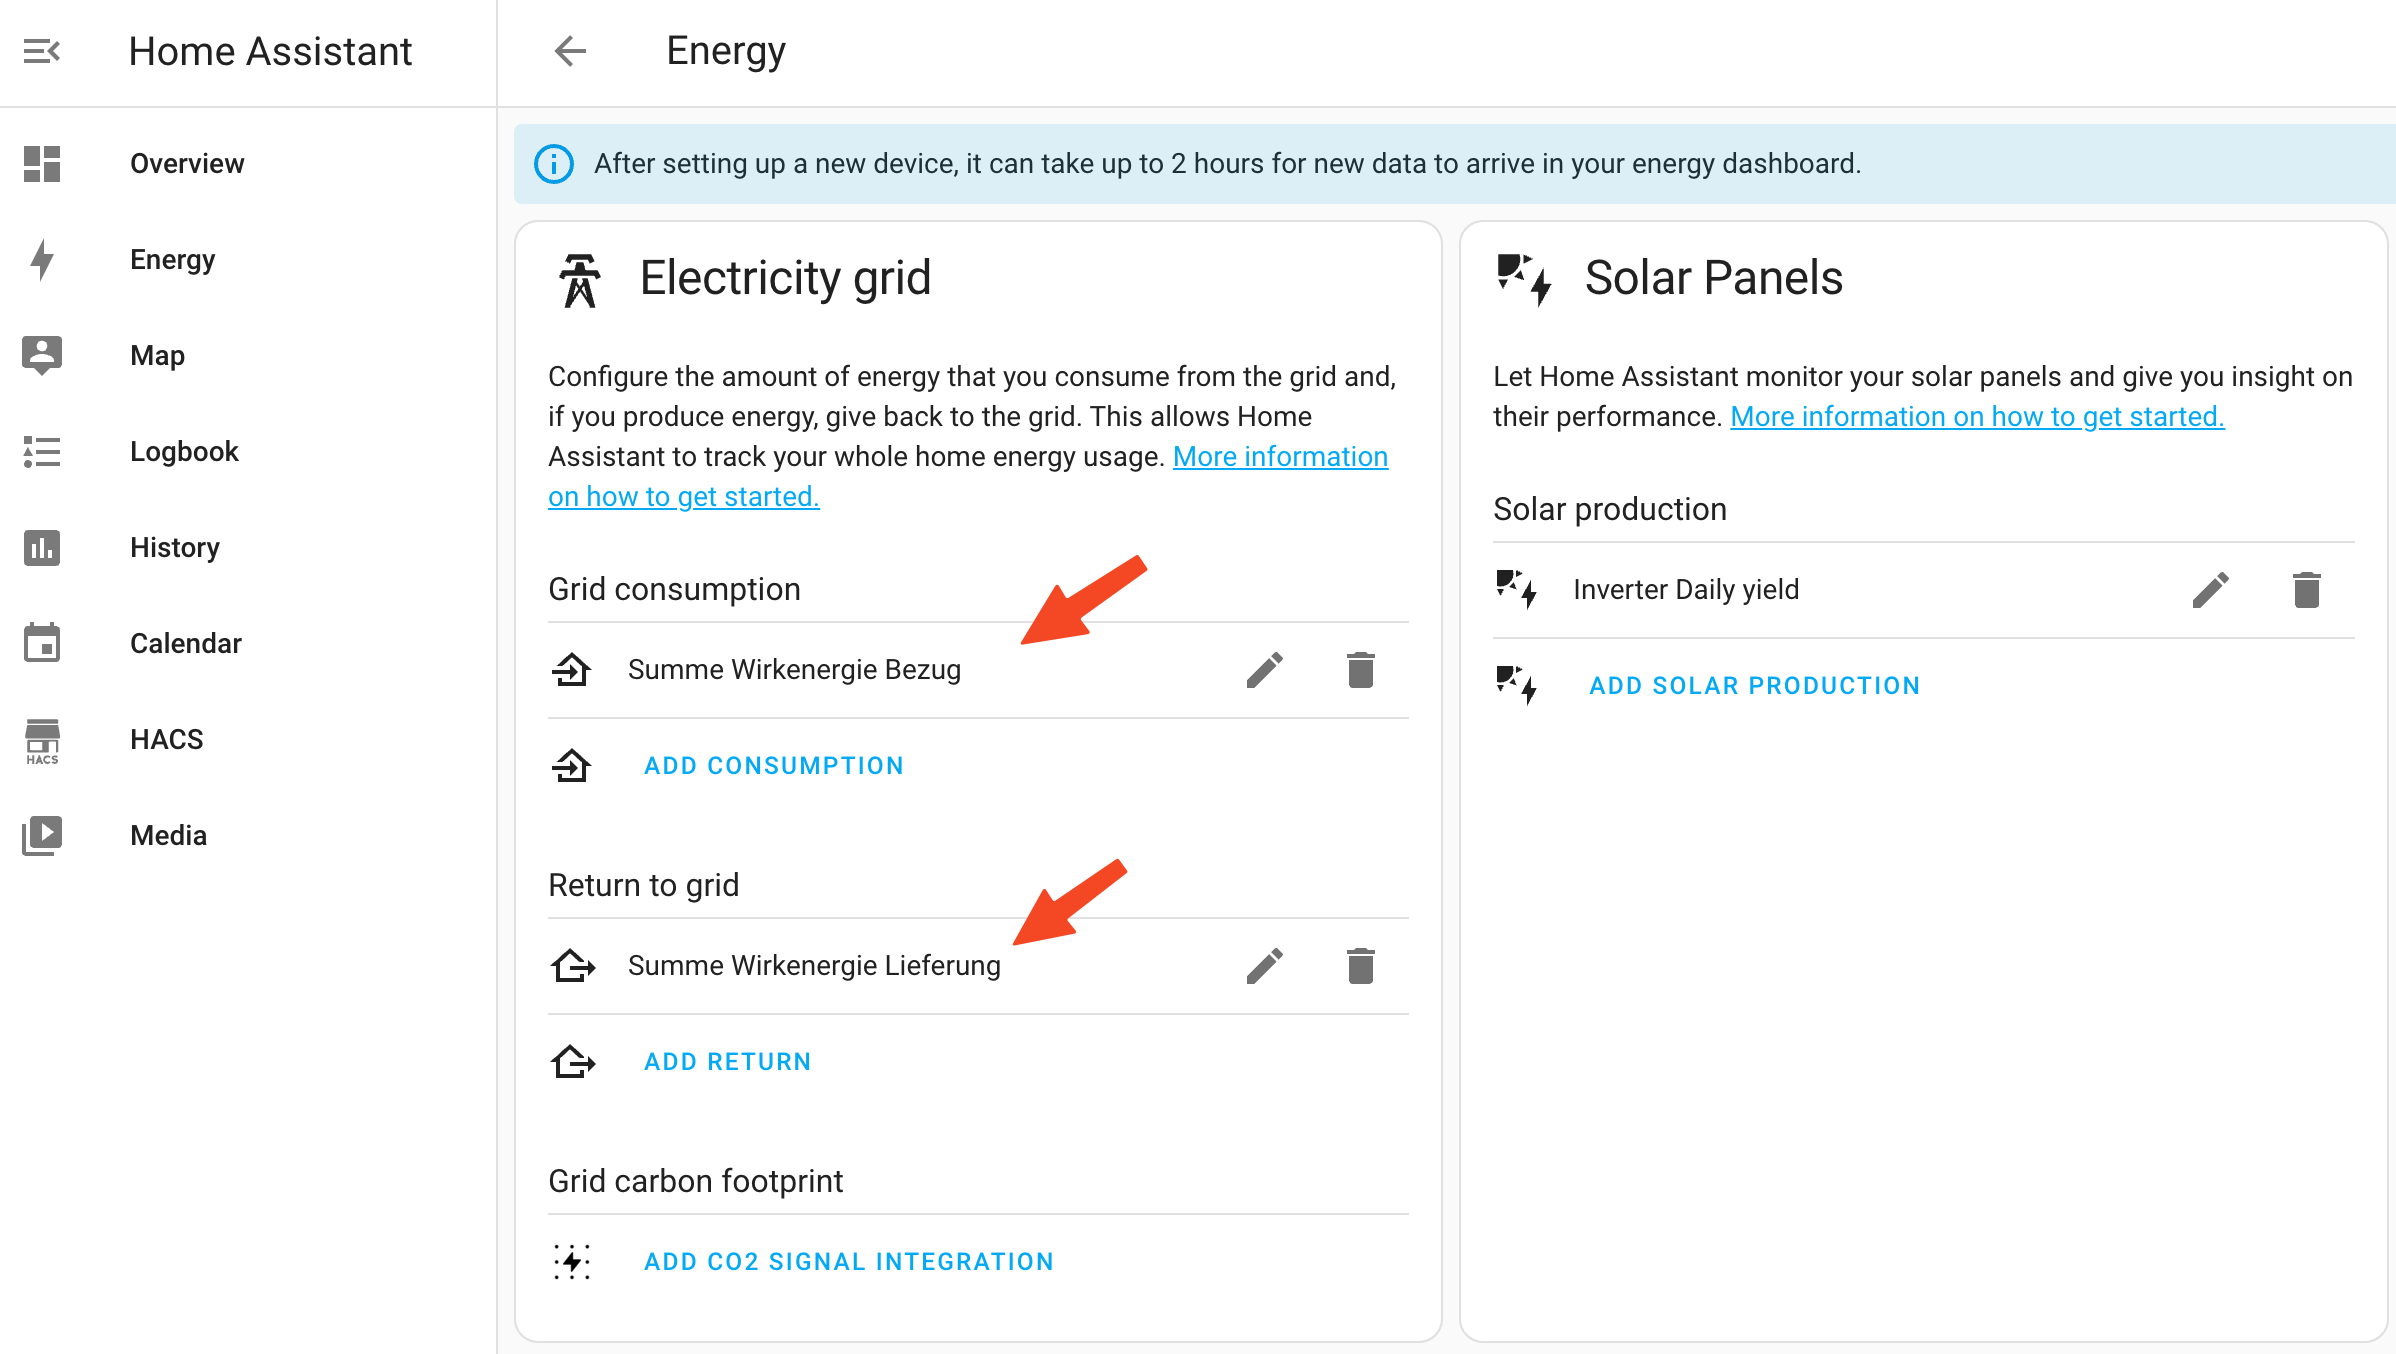
Configuring the Energy dashboard
You can reach the configuration screen via Settings->Dashboard->Energy
Make the following configuration
Then your dashboard should look something like this
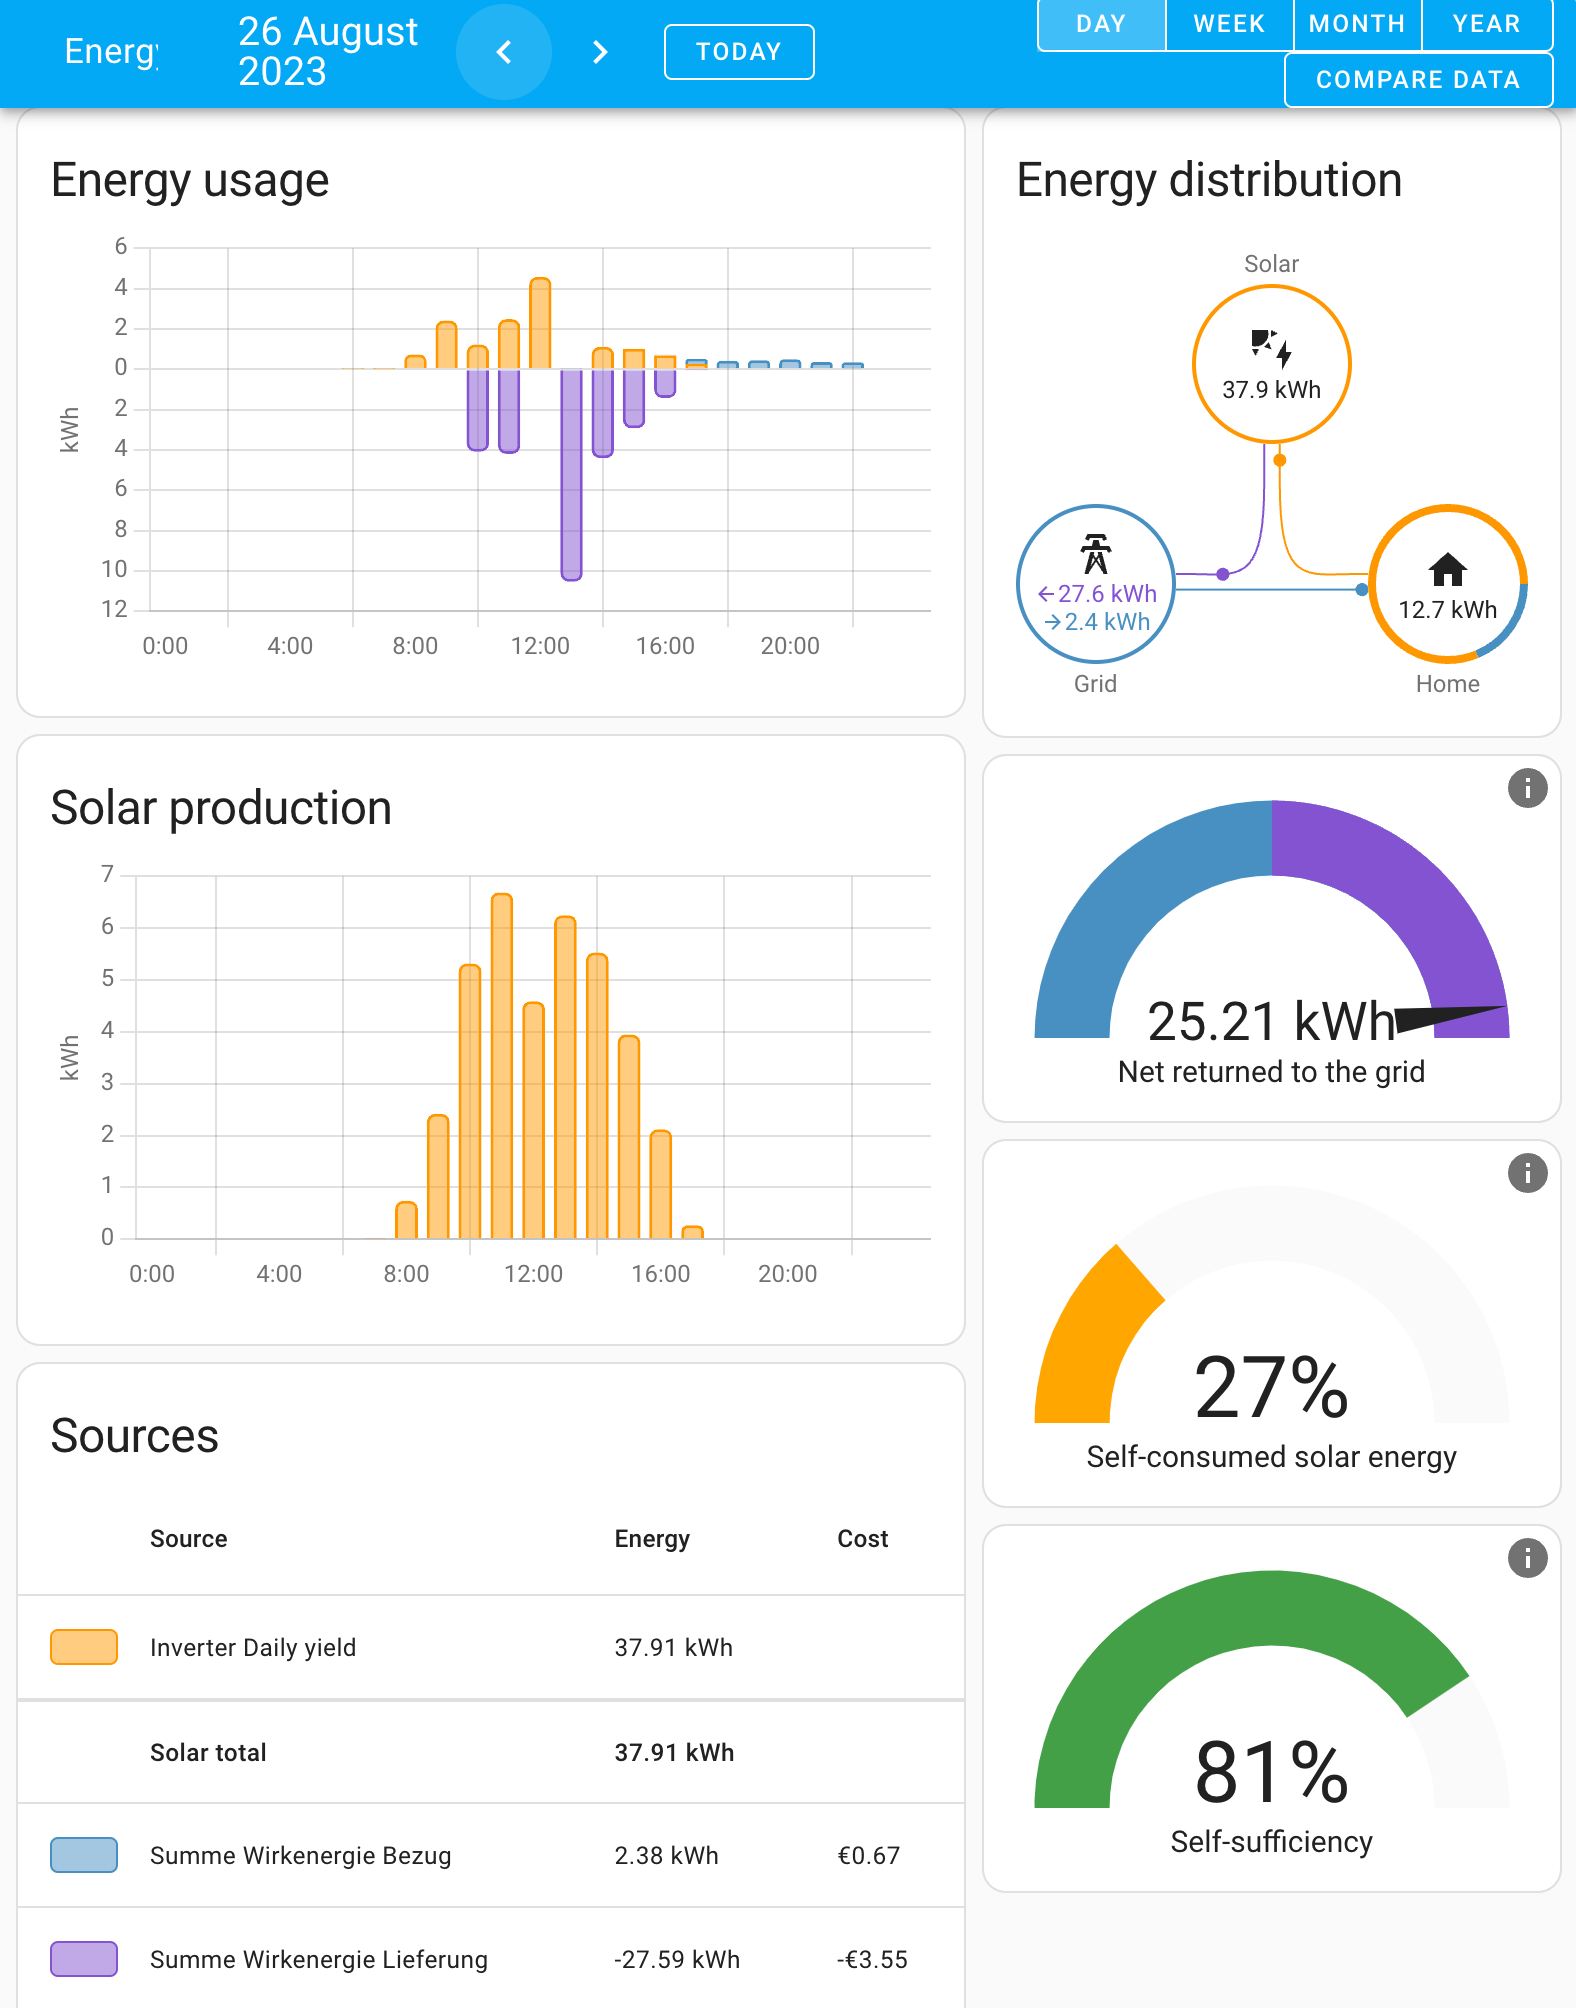
Finally you can add another dashboard to get more details about your current consumption vs delivery (I recommend apex charts).
With the following graph you can nicely visualize what you are pulling from the grid vs what you provide.
type: custom:apexcharts-cardheader: show: true title: Solar show_states: true colorize_states: truegraph_span: 4hseries: - entity: sensor.wechselrichter_active_power_kw type: line curve: smooth stroke_width: 1 - entity: sensor.momentanleistung_bezug type: line invert: true curve: smooth stroke_width: 1 - entity: sensor.momentanleistung_lieferung type: line invert: false curve: smooth stroke_width: 1Obviously, this requires that your inverter is also integrated into Home Assistant.
In the next few days I will probably document my Huawei SUN2000 setup as well.
Thanks for reading!
Links
- Documentation of the whole process: https://www.libe.net/smart-meter
- Installation and configuration of mosquitto: https://myhomethings.eu/de/mosquitto-mqtt-broker-installation-auf-raspberry-pi/
- Install raspberry pi without monitor: https://www.tomshardware.com/reviews/raspberry-pi-headless-setup-how-to,6028.html
- setup MQTT energy sensors for Home Assistant https://community.home-assistant.io/t/energy-setup-using-mqtt-energy-sensors/367175
- MQTT on raspberry pi: https://www.az-delivery.de/blogs/azdelivery-blog-fur-arduino-und-raspberry-pi/mqtt-auf-dem-raspberry-pi-und-mit-micropython-auf-der-esp-familie-teil-1
- Setting up TLS for mosquitto: http://www.steves-internet-guide.com/mosquitto-tls/
- Testing mosquitto on raspberry pi: https://www.sigmdel.ca/michel/ha/rpi/mosquitto_rpios_bullseye_en.html
- Setting up TLS for mosquitto which works with homeassistant: https://community.home-assistant.io/t/solved-mqtt-with-ssl-tls-not-working-with-home-assistant/180361/11
- Static IP for Raspberry PI: https://www.tomshardware.com/how-to/static-ip-raspberry-pi
- Apex Charts Home Assistant: https://github.com/RomRider/apexcharts-card