In the previous installment of this series we created a react application that read the
content from our server and allowed editing Club entities via an HTML form.
Here, we will create the same application using a react based frontend that allows us to edit Here, we will create the same application using Svelte.
Creating the client
We will scaffold an empty project with vite:
pnpm create viteIn the options choose
- Svelte
- TypeScript
Then we add the necessary dependencies
pnpm add @sveltestack/svelte-query felte @felte/validator-zod \ @tanstack/svelte-table @zerodevx/svelte-toast \ svelte-navigator zodpnpm add -D prettier sassNow we can already start the dev server and see our generated application:
pnpm devWe open the browser at http://127.0.0.1:5173/ and are greeted with the scaffolded sample app:
Integrating the router
First we integrate svelte navigator by adding a couple of pages
-
in
client-svelte/src/pages/Home.svelte<script lang="ts"></script><h1>Home</h1> -
client-svelte/src/pages/club/ClubList.svelte<script lang="ts"></script><h1>Club List</h1> -
client-svelte/src/pages/club/SingleClub.svelte<script lang="ts"></script><h1>Single Club</h1> -
client-svelte/src/pages/club/ClubEdit.svelte<script lang="ts">export let id;</script><h1>Single Club Edit {id}</h1>
Now we configure the router in App.svelte
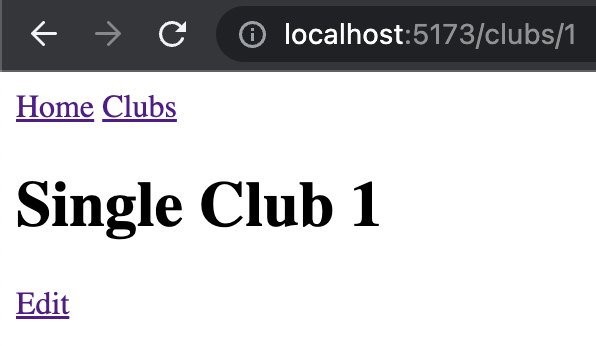
<script lang='ts'> import { Router, Route, Link } from 'svelte-navigator' import Home from './pages/Home.svelte' import ClubList from './pages/club/ClubList.svelte' import SingleClub from './pages/club/SingleClub.svelte' import ClubEdit from './pages/club/ClubEdit.svelte'</script><Router> <header> <nav> <Link to='/'>Home</Link> <Link to='/clubs'>Clubs</Link> </nav> </header> <main> <Route path='/'> <Home /> </Route> <Route path='/clubs/*'> <Route path='/' component={ClubList} /> <Route path=":id/edit" component={ClubEdit} /> <Route path=":id" component={SingleClub} /> </Route> </main></Router><style></style>If we navigate to http://localhost:5173/clubs/1 then we should now see our single club page:
If you have a dark background still, just empty the app.css file.
Integrating svelte-query
Just like in the previous react tutorial we will use svelte-query which is a 1:1 port of react-query.
First we need to add a provider in App.svelte
<script lang='ts'>...  import { QueryClient, QueryClientProvider } from '@sveltestack/svelte-query'
  const queryClient = new QueryClient()</script><QueryClientProvider client={queryClient}>  <Router>    <header>  ... </Router></QueryClientProvider>
To be able to call our apis we define the data model in
src/lib/model.ts
import { z } from "zod";
export const ClubSchema = z.object({  clubName: z.string().min(2).max(150),  managerEmail: z.string().email().max(200),  id: z.string().optional(),});
export type Club = z.infer<typeof ClubSchema>;
and the api methods in src/lib/api.ts
import type { Club } from "./model";
export async function fetchClubs() {  const result = await fetch("/api/clubs");  return (await extractJsonOrError<any>(result))._embedded.clubs as Club[];}
async function extractJsonOrError<T>(result: Response): Promise<T> {  let body: any;  try {    body = await result.json();  } catch (e) {    console.error("error extracting error body", e);  }  if (!result.ok) {    const error = new Error("Network response was not ok", { cause: body });    throw error;  }  return body as T;}
export async function fetchClub(id: string): Promise<Club> {  const result = await fetch(`/api/clubs/${id}`);  return await extractJsonOrError(result);}
export async function updateClub(club: Club): Promise<Club> {  const result = await fetch(`/api/clubs/${club.id}`, {    body: JSON.stringify(club),    method: "PUT",    headers: { "content-type": "application/json", accept: "application/json" },  });  return extractJsonOrError(result);}
Unsurprisingly, both of these files are an exact copy of the react based version.
One thing missing is the proxy configuration in the frontend that
will allow us to connect to the spring backend. Add the following lines to client-svelte/vite.config.ts
export default defineConfig({ plugins: [react()], server: { proxy: { "/api": "http://localhost:8080", }, },});Loading the club data
As we have all the basics out of the way we can finally load
our club list in src/pages/club/ClubList.svelte
<script lang='ts'>  import { useQuery } from '@sveltestack/svelte-query'  import { fetchClubs } from '../../lib/api'  import { Link } from 'svelte-navigator'
  const queryResult = useQuery('clubs', fetchClubs)</script><h1>Club List</h1>{#if $queryResult.isLoading}  <span>Loading...</span>{:else if $queryResult.error}  <span>An error has occurred: {$queryResult.error.message}</span>{:else}  <ul>    {#each $queryResult.data as club}      <li><Link to={`/clubs/${club.id}`}>{club.clubName}</Link></li>    {/each}  </ul>{/if}
Now browsing to http://localhost:5173/clubs produces 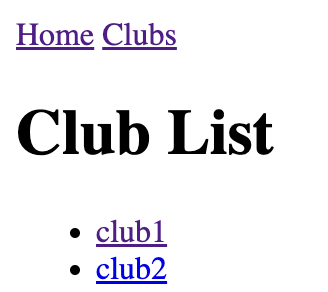
While we won’t win any beauty contest with that, it is functional, so let’s move on.
Clicking on a club line will cause the browser to navigate to http://localhost:5173/clubs/395152559210943000
which is currently still an empty page, let’s fix that by changing src/pages/club/SingleClub.svelte to
<script lang="ts">  import { Link } from 'svelte-navigator'  import { useQuery } from '@sveltestack/svelte-query'  import { fetchClub } from '../../lib/api'
  export let id;
  const queryResult = useQuery(['clubs', id], () => fetchClub(id), {enabled: !!id})</script><h1>Single Club {id}</h1>{#if $queryResult.isLoading}  <span>Loading...</span>{:else if $queryResult.error}  <span>An error has occurred: {$queryResult.error.message}</span>{:else}  <ul>    <li>id: {$queryResult.data.id}</li>    <li>name: {$queryResult.data.clubName}</li>    <li>manager email: {$queryResult.data.managerEmail}</li>  </ul>{/if}<Link to={`/clubs/${id}/edit`}>Edit</Link>
This is basically more of the same. We simply load a single club rather than the whole list of clubs.
To edit a club we need to update the src/pages/club/EditClub.svelte page to look like this:
<script lang="ts">  import { useQuery } from '@sveltestack/svelte-query'  import { fetchClub } from '../../lib/api'
  export let id;
  const queryResult = useQuery(['clubs', id], () => fetchClub(id), {enabled: !!id})</script><h1>Edit Club {id}</h1>{#if $queryResult.isLoading}  <span>Loading...</span>{:else if $queryResult.error}  <span>An error has occurred: {$queryResult.error.message}</span>{:else}  <ClubForm data={$queryResult.data}/>{/if}
This is just a carbon copy of the SingleClub.svelte file but we are using the not yet defined
ClubForm.
Create the file src/lib/components/ClubForm.svelte with the following content:
<script lang='ts'>  import { createForm } from 'felte'  import type { Club } from '../model'  import { ClubSchema } from '../model'  import type { ValidatorConfig } from '@felte/validator-zod'  import { validator } from '@felte/validator-zod'  import { updateClub } from '../api'  import { useMutation } from '@sveltestack/svelte-query'  import { SvelteToast, toast } from '@zerodevx/svelte-toast'
  export let data: Club = {}
  const { form, errors, setErrors } = createForm({    onSubmit: (values) => {      console.log('submit form', values)      doUpload(values)    },    extend: validator({ schema: ClubSchema } as ValidatorConfig),    initialValues: data  })
  const mutation = useMutation(updateClub, {    onSuccess: (result, variables, context) => {      toast.push('Changes Saved')    },    onError: (error: any, variables, context) => {      console.log('mutation error', error)      const errorDetails = error.cause?.errors      if (errorDetails) {        Object.keys(errorDetails).forEach(key => {          setErrors(key, errorDetails[key].message)        })        console.log('got errorDetails', errorDetails)        toast.push('Saving failed: ' + error.message)      }    }  })
  function doUpload(updatedClub: Club) {    $mutation.mutate(updatedClub)  }</script>
<SvelteToast /><form method='post' use:form>  <fieldset>    <label for='clubName'>Club Name</label>    <div>      <input id='clubName' type='text' name='clubName'>      {#if $errors['clubName']}        <small class='p-error'>{$errors['clubName'][0]}</small>      {/if}    </div>    <label for='managerEmail'>Manager Email</label>    <div>      <input id='managerEmail' type='email' name='managerEmail'>      {#if $errors['managerEmail']}        <small class='p-error'>{$errors['managerEmail'][0]}</small>      {/if}    </div>  </fieldset>  <button type='submit'>Save</button></form>
<style>    .p-error {        color: red;    }
    fieldset {        display: grid;        grid-template-columns: max-content 1fr;        gap: 5px;    }</style>
If you have already read part 2 of the tutorial then you should be already quite familiar with what is happening here.
If you are new to the series here is a quick explanation.
export let data: Club = {};We define an input data of type Club here which is passed in by ClubEdit.svelte.
const { form, errors, setErrors } = createForm({ onSubmit: (values) => { console.log("submit form", values); doUpload(values); }, extend: validator({ schema: ClubSchema } as ValidatorConfig), initialValues: data,});Now we define a felte form that uses the zod validator for ensuring our data is valid.
const mutation = useMutation(updateClub, { onSuccess: (result, variables, context) => { toast.push("Changes Saved"); }, onError: (error: any, variables, context) => { console.log("mutation error", error); const errorDetails = error.cause?.errors; if (errorDetails) { Object.keys(errorDetails).forEach((key) => { setErrors(key, errorDetails[key].message); }); console.log("got errorDetails", errorDetails); toast.push("Saving failed: " + error.message); } },});This is the mutation that will upload all changes to the server. If we encounter an error
we parse the error response to figure out which field had which problem and use
setErrors to populate the client validation errors.
In addition we show a toast message that saving has failed.
function doUpload(updatedClub: Club) { $mutation.mutate(updatedClub);}The doUpload method is super trivial. This is being called after a successful validation
by felte and only triggers the mutation.
<SvelteToast /><form method='post' use:form> <fieldset> <label for='clubName'>Club Name</label> <div> <input id='clubName' type='text' name='clubName'> {#if $errors['clubName']} <small class='p-error'>{$errors['clubName'][0]}</small> {/if} </div> <label for='managerEmail'>Manager Email</label> <div> <input id='managerEmail' type='email' name='managerEmail'> {#if $errors['managerEmail']} <small class='p-error'>{$errors['managerEmail'][0]}</small> {/if} </div> </fieldset> <button type='submit'>Save</button></form>The UI part is very simple. All we need to do is define the input and label
fields and if we have an error, then we display an error annotation.
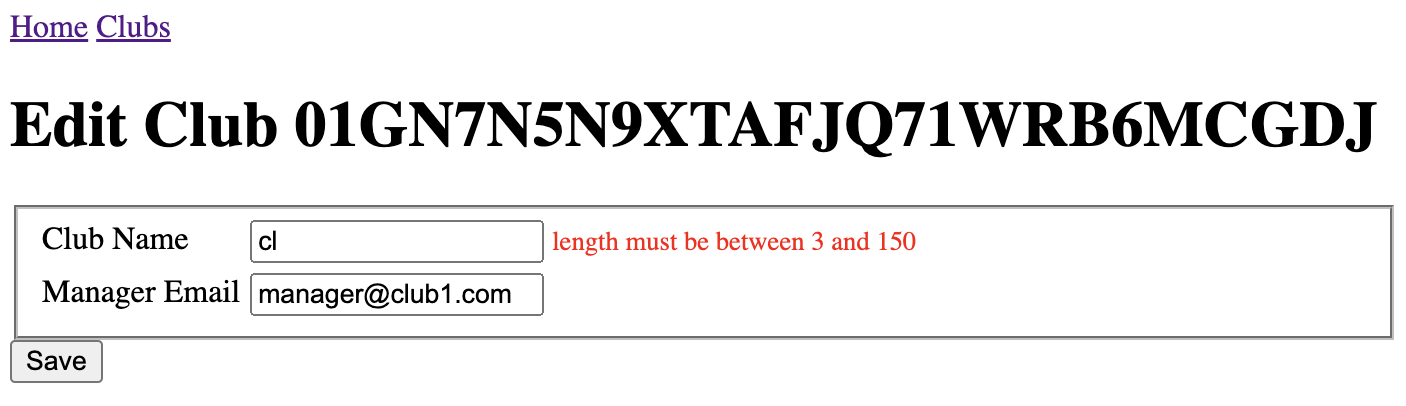
If we now enter a invalid data, then we should immediately see the validation errors in the form:
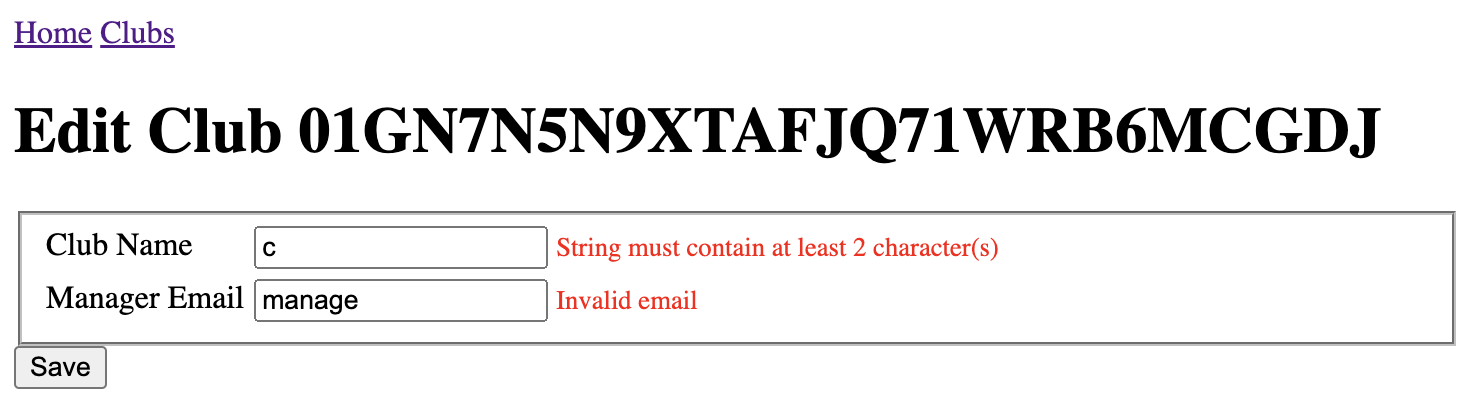
Testing server side validation errors
Now if you remember the zod validation we created way back when,
you might notice that there is a discrepancy between the minimum
length in typescript
export const ClubSchema = z.object({ clubName: z.string().min(2).max(150),and the corresponding java code
public class Club { ... @Column @NotBlank @Length(min = 3, max = 150) String clubName;To be able to produce a server side validation error all we need
to do is to update a club and assign it a clubName that is
only 2 characters long.
The server side validation errors are rendered in-line just like
client side validation errors would.
This concludes part 3 of the tutorial, check out the next article in the series about sorting and paging.
You can find the code to this tutorial at https://github.com/rburgst/spring-boot-validation